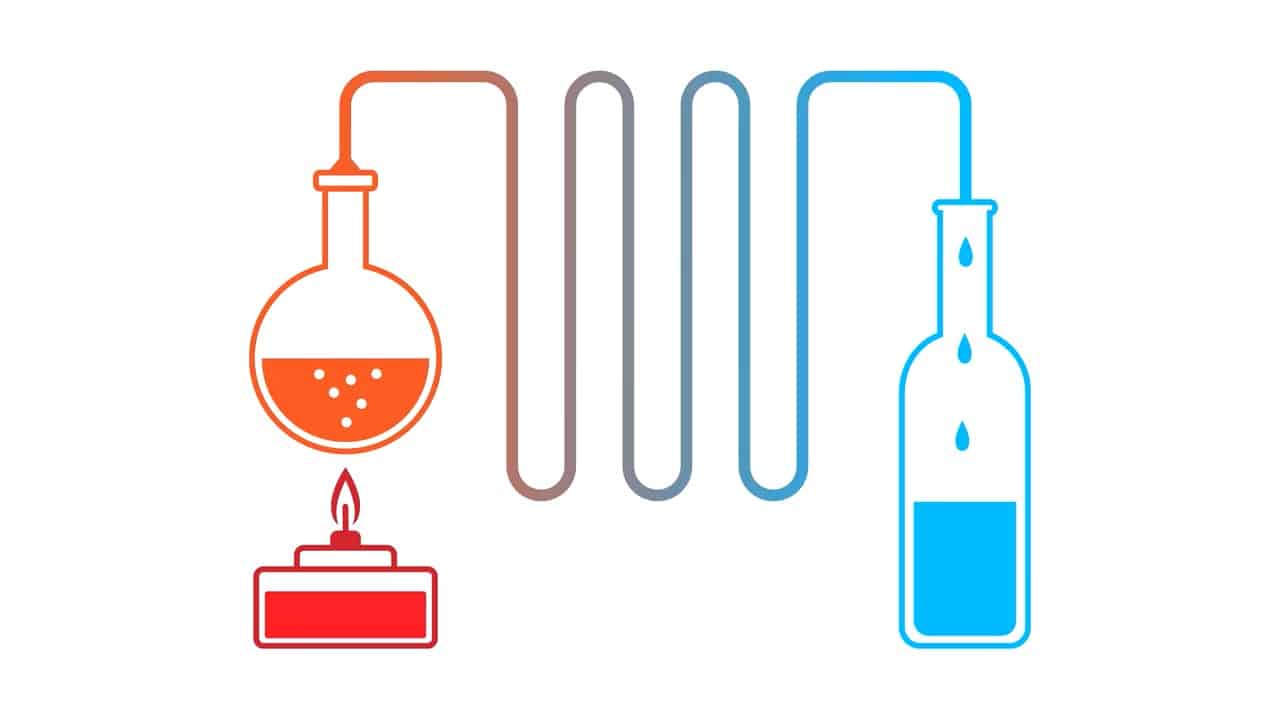
In this project, we will guide you through the process of building a cost-effective homemade water distiller that can effectively purify contaminated water and desalinate saltwater, providing a reliable source of clean drinking water.
The three essential components required for this distillation process include water, a source of heat, and an apparatus that can facilitate the boiling of water into steam and the subsequent condensation of that steam into clean water.
With a total cost of around sixty dollars, this DIY water distiller can be an excellent investment for those seeking to purify water from unreliable sources, such as lakes, rivers, or wells.
STEP 1 : THE MATERIALS REQUIRED
A water distiller is a simple yet effective device that can purify water by removing contaminants and impurities. It works by boiling water to create steam, and then capturing and condensing that steam back into liquid form.
To build a water distiller at home, you will need some basic materials and tools.
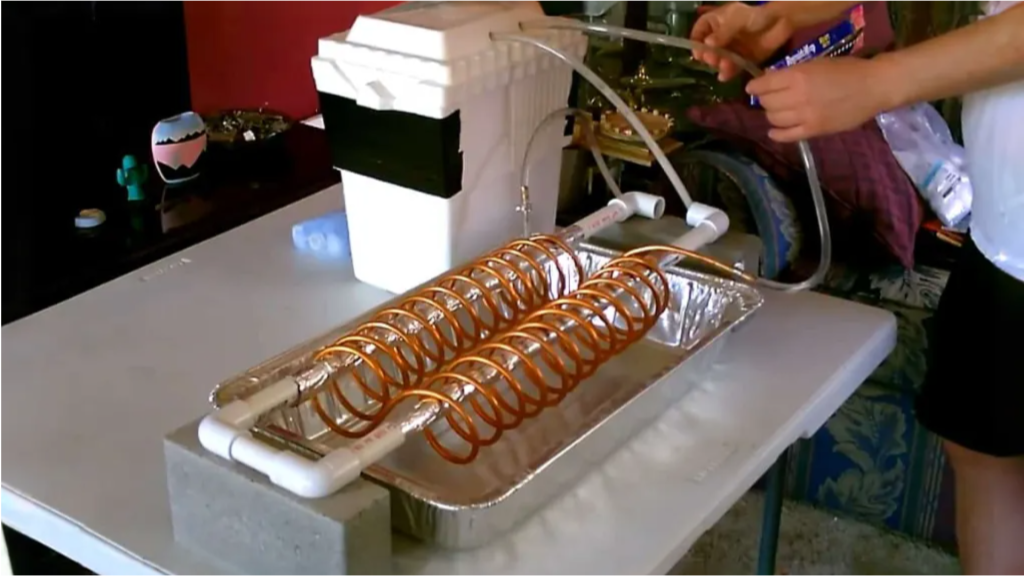
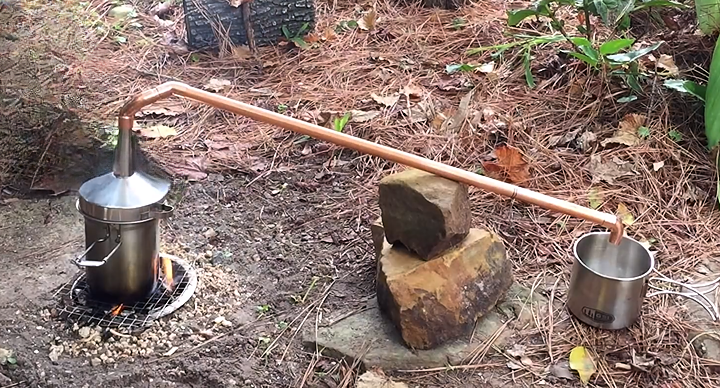
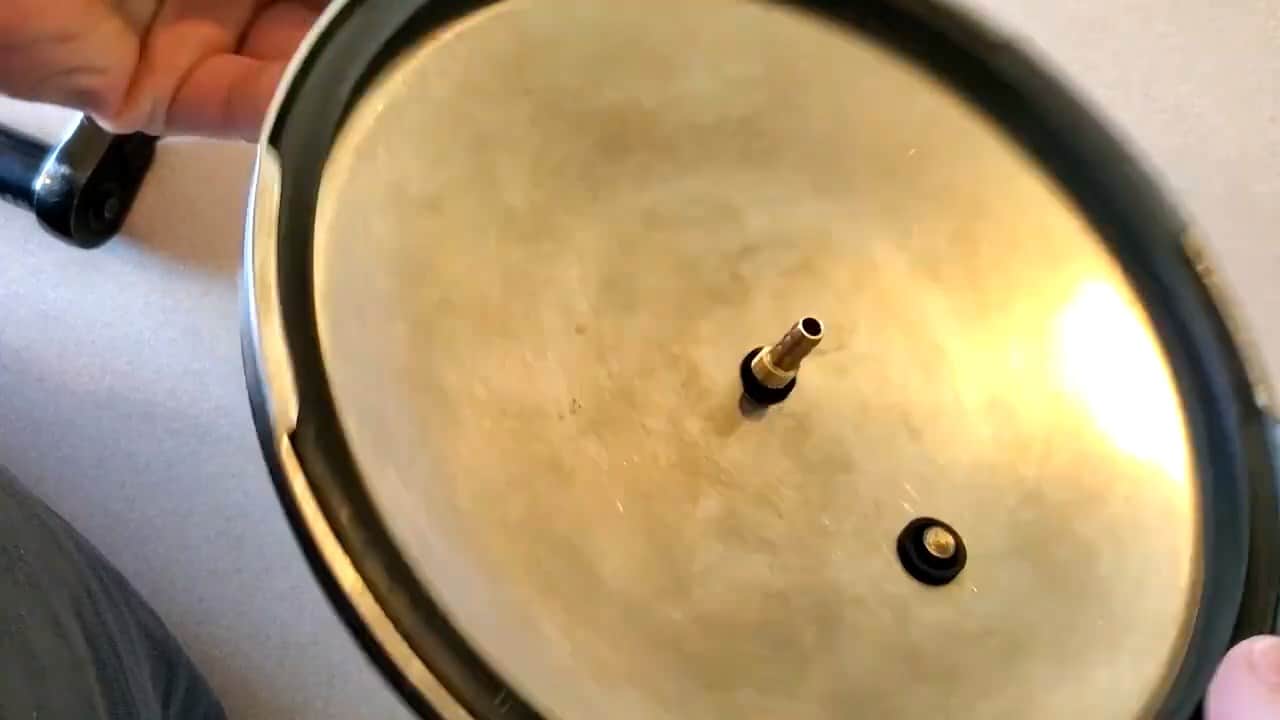
First and foremost, you will need a six-quart stainless steel pressure cooker, which will serve as the boiling chamber for the water.
This type of pressure cooker is ideal for this project, as it is made of durable and heat-resistant material, and has a tight-fitting lid that will help contain the steam.
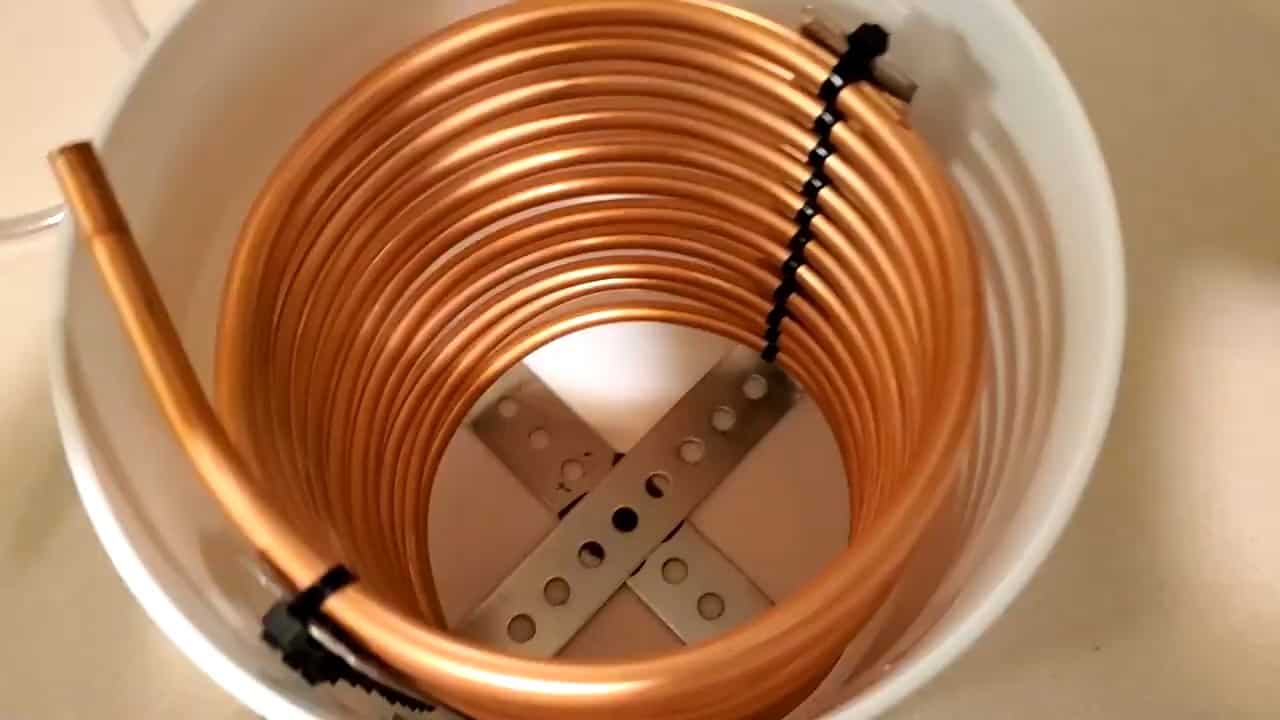
Next, you will need a 20-foot length of three-eighth-inch copper tubing. This will be used to transfer the steam from the pressure cooker to a cooling chamber, where it will condense back into liquid form.
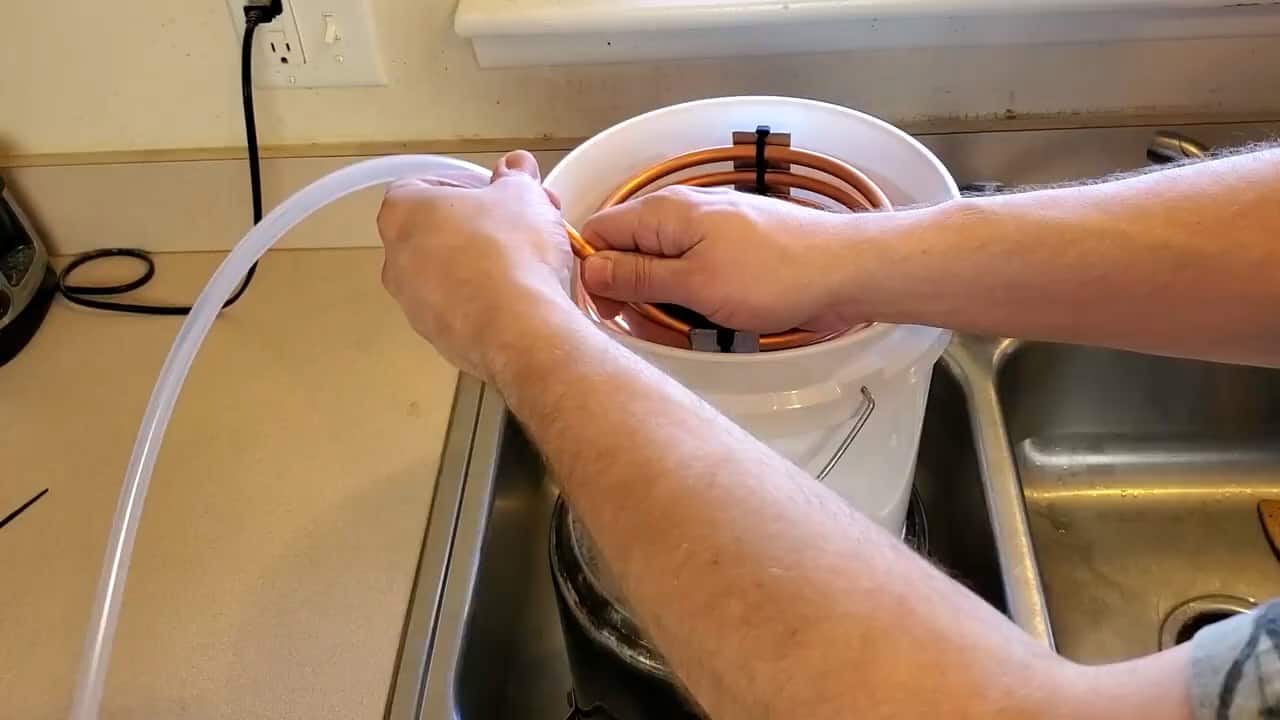
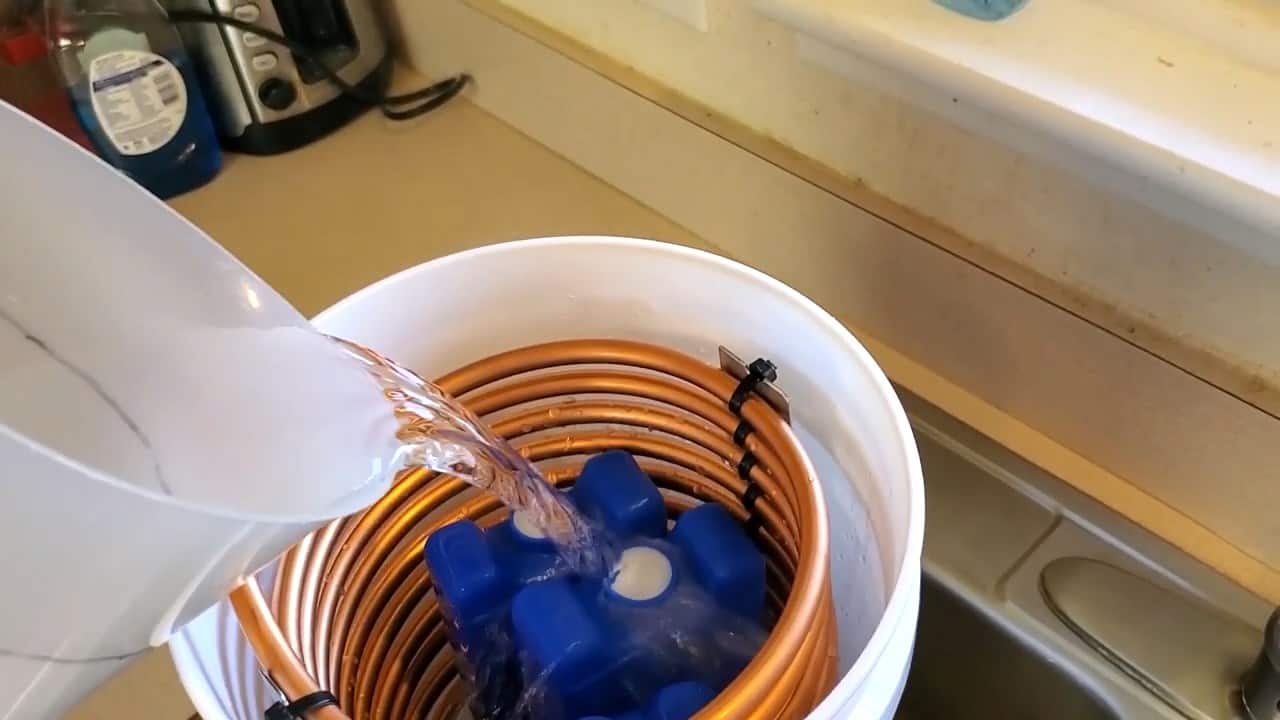
The tubing should be coiled tightly and secured with zip ties or a flat bar to maintain its shape.You will also need a two-gallon bucket, which will serve as the cooling chamber.
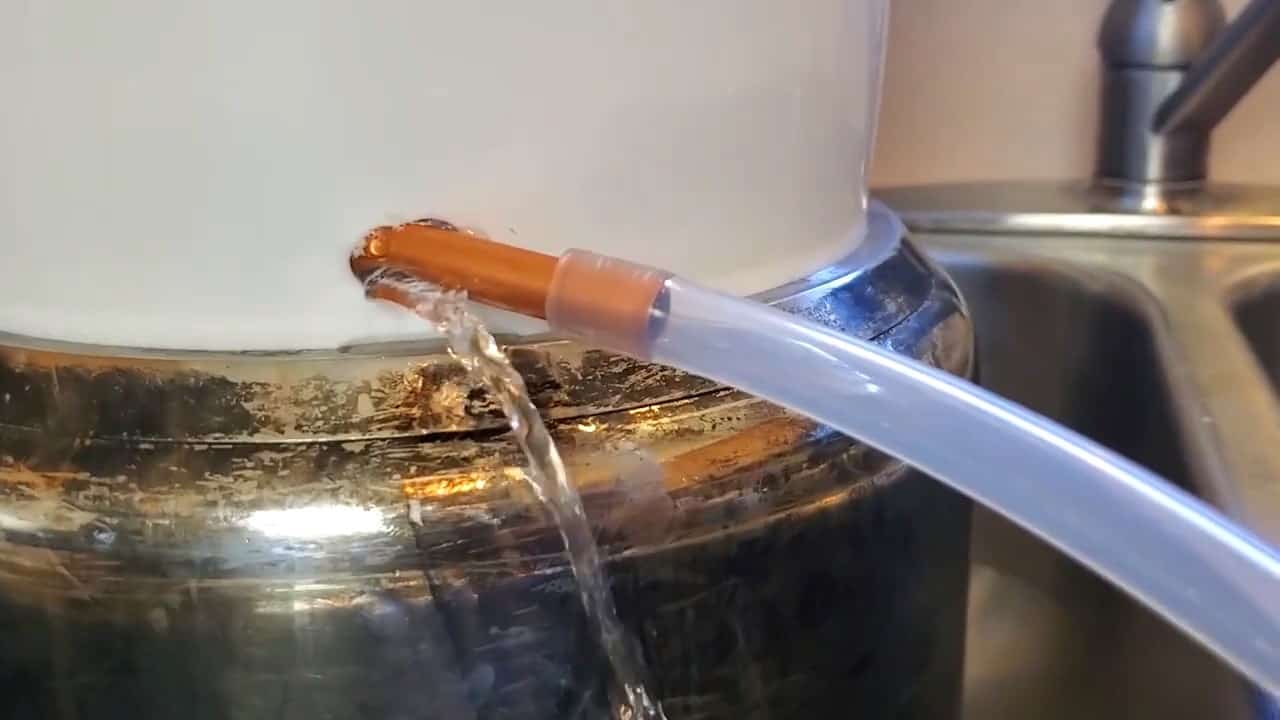
To connect the copper tubing to the bucket, you will need a small amount of JB Weld, a high-strength epoxy adhesive. Simply apply a small amount of JB Weld to the end of the copper tubing and insert it into a small hole drilled in the side of the bucket.
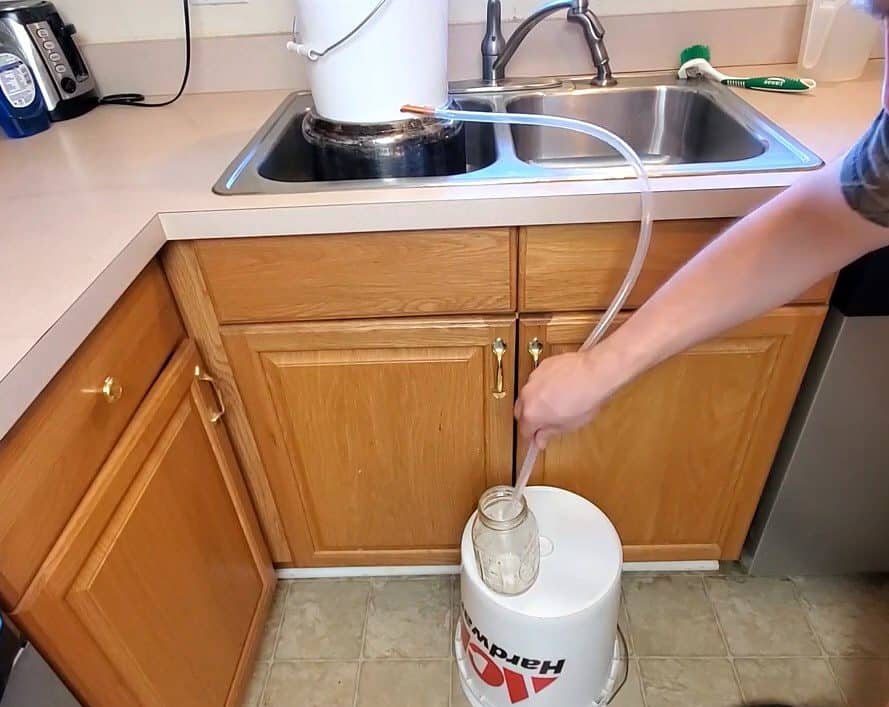
To complete the distillation process, you will need some additional tubing and a mason jar to collect the purified water. Five-sixteenth inch silicone tubing can be used to connect the cooling chamber to the mason jar, allowing the distilled water to flow into the jar as it condenses.

STEP 2 : BOILING THE WATER
Once you have everything you need, the first step is to fill the pressure cooker with the contaminated water. Make sure not to fill it to the top to allow some space for the steam to gather. Securely fasten the lid of the pressure cooker.
Next, the existing pressure valve of the pressure cooker needs to be removed to allow for a barbed fitting to be installed. The new fitting should be appropriately sized to fit the copper tubing securely. A small rubber O ring gasket is used to create a tight seal between the fitting and the lid of the pressure cooker.

STEP 3 : MAKING THE CONDENSER
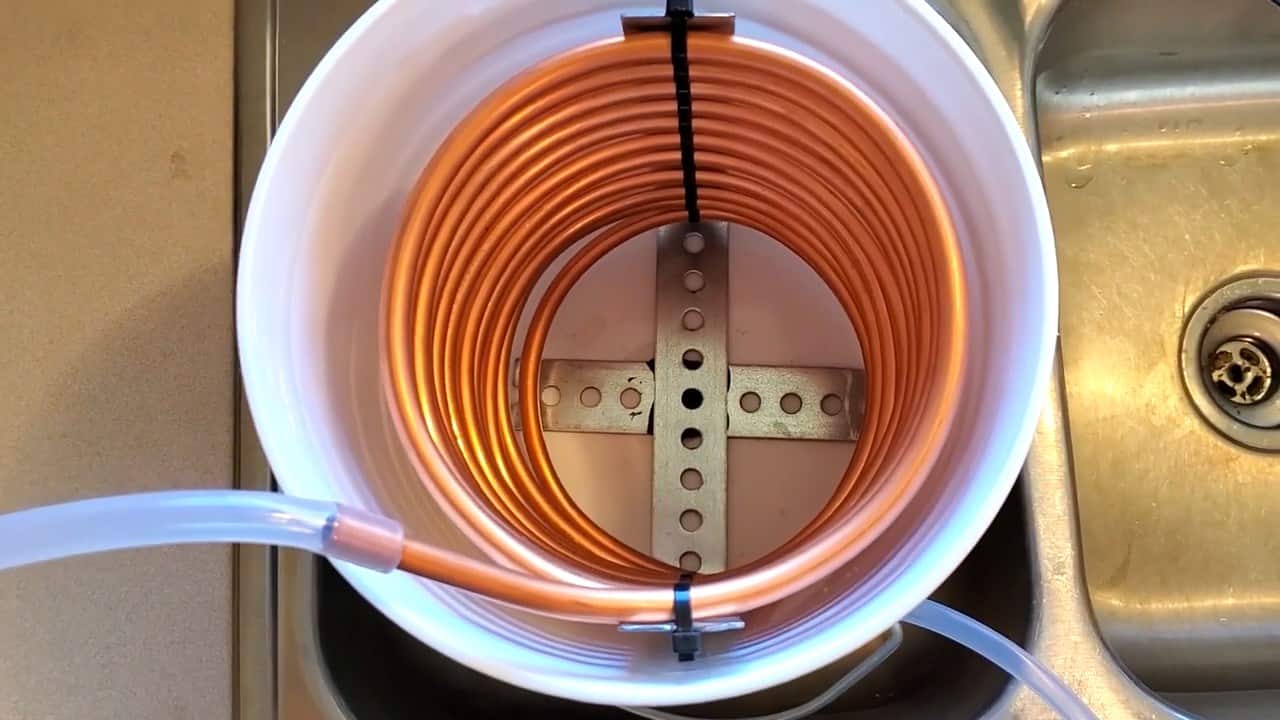
The condenser is a critical component of the water distiller as it plays a vital role in transforming the steam back into liquid water. To make the condenser, you’ll need a 20-foot-long, three-eighth-inch copper tubing.
First, take the copper tubing and use a tubing bender to form it into a tight coil shape that’s tall enough to fit into a two-gallon bucket.
The key to creating an efficient condenser is to ensure that the coils are compactly spaced and evenly distributed.
A loose coil will not effectively cool down the steam, while a tight one may result in a slower flow of distilled water. To achieve the right balance, it’s best to take your time while bending the copper tubing.
STEP 4 : CONNECTING THE U SHAPED SUPPORT
After creating a tight and tall coil from the 20-foot-three-eighth-inch copper tubing, it is essential to provide adequate support to prevent the coil from collapsing due to its weight.
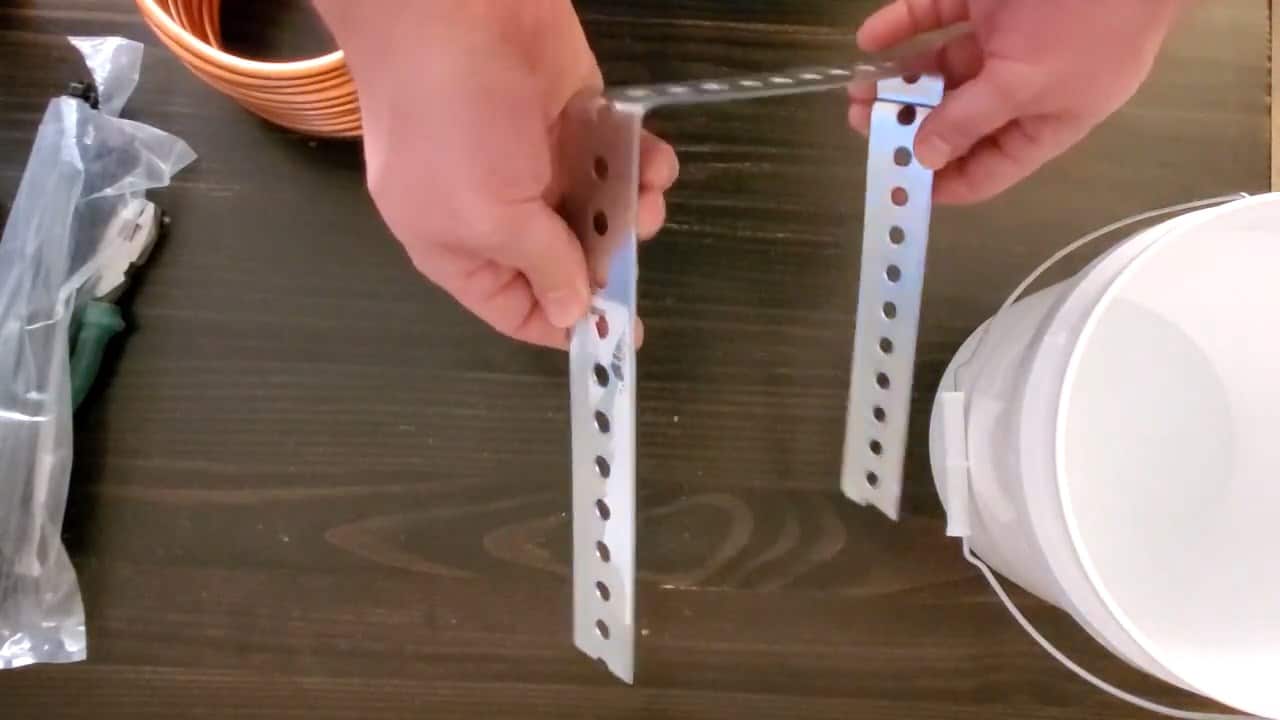
This is where a flat bar bent into a U shape comes in handy. The U-shaped bar is placed under the coil, providing a stable base.
To make the condenser even sturdier, a small crosspiece is attached to the bottom of the U-shaped bar using a JB weld. The JB weld acts as a strong adhesive and creates a permanent bond between the two pieces, making the condenser more robust.
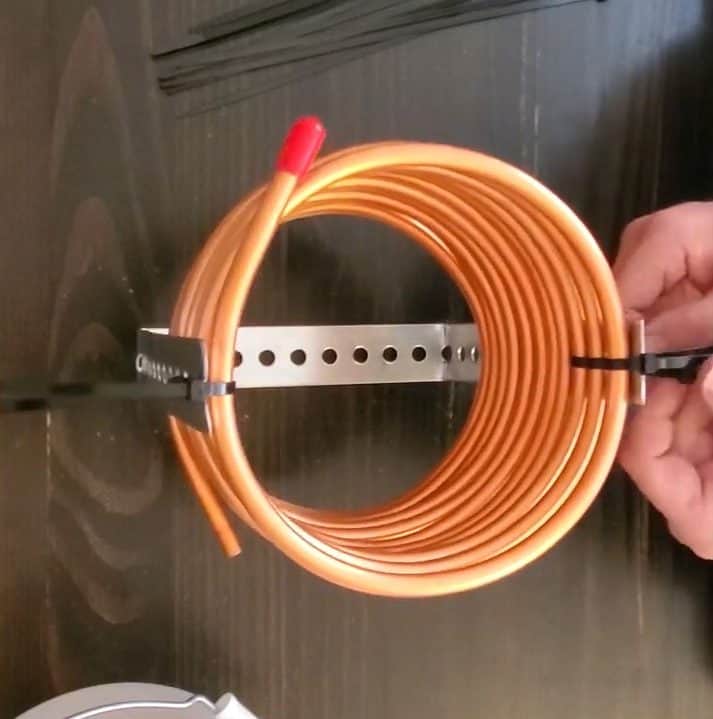
After attaching the crosspiece, it is time to attach the coil to the punched bar using zip ties. The zip ties help to secure the coil in place and prevent it from moving around during the distillation process.
It is crucial to ensure that the coil is fastened tightly to the punched bar to avoid any leaks.
STEP 5 : MAKING HOLE FOR THE DRAINAGE
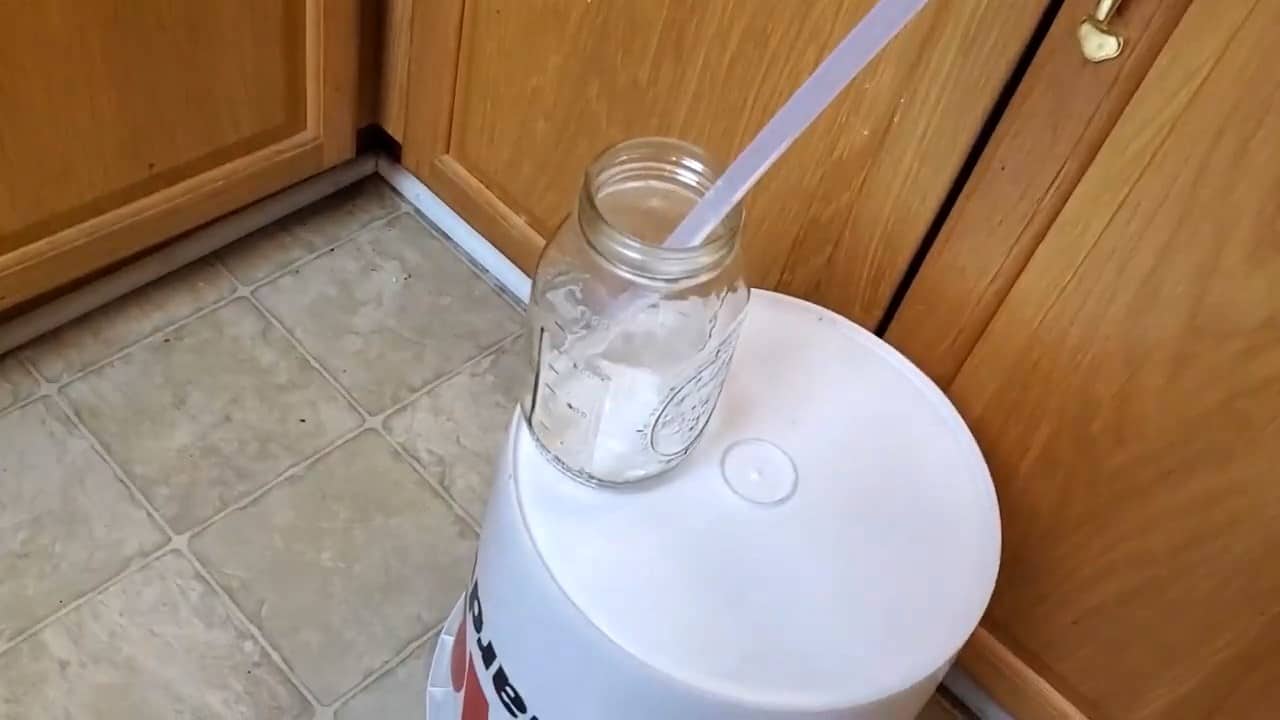
To complete the distillation process, a container is needed to collect the purified water that comes out of the condenser. For this, a mason jar is used.
The next step is to drill a small hole near the bottom of the two-gallon bucket. This hole should be just big enough to allow the copper tubing to pass through, so that the condensed water can drain out.
Once the hole is drilled, the tightly coiled copper tubing is carefully placed inside the bucket. To prevent the tubing from collapsing under its own weight, a flat bar is bent into a U shape and placed underneath the coil, providing a sturdy base.
To further secure the coil, a small cross piece is attached to the U-shaped bar at the bottom using JB weld. Finally, the coil is attached to the punched bar using zip ties.
fter placing the coil inside the bucket, the tail end of the coil is pushed through the hole at the bottom, so that it protrudes from the outside of the bucket. This end will be attached to the mason jar, which will collect the purified water that comes out.
STEP 6 : COLLECTING THE CLEAN WATER
To connect the condenser to the pressure cooker, a 5/16th inch silicon tubing is used. One end of the tubing is attached to the barbed fitting on the pressure cooker, and the other end is inserted into the top of the condenser coil.
Similarly, to collect the purified water, a 5/16th inch silicon tubing is connected to the bottom of the condenser coil. This tubing is then directed into a clean water receptacle such as a mason jar.
It is important to ensure that both tubing connections are secure and tight to avoid any leaks that could affect the performance of the water distiller.
STEP 7 : ADDING COOLING ELEMENT FOR EFFICIENCY
It is crucial to ensure that the steam is cooled down properly during the water distillation process. Although the copper coil in the condenser can cool down some of the steam, it is not enough at this scale.
Without adequate cooling, a significant amount of steam may escape through the bottom of the condenser without condensing.
To solve this problem, a bucket of ice or cold water can be placed on top of the condenser. This helps to cool down the steam further as it travels through the copper coil. The cold temperature of the ice or water makes the copper coil even more effective in cooling and condensing the steam.
Another option is to use a small fan to blow air over the condenser. This helps to dissipate the heat and increase the cooling effect. The fan can be placed at a distance and directed towards the condenser to maximize the cooling effect.
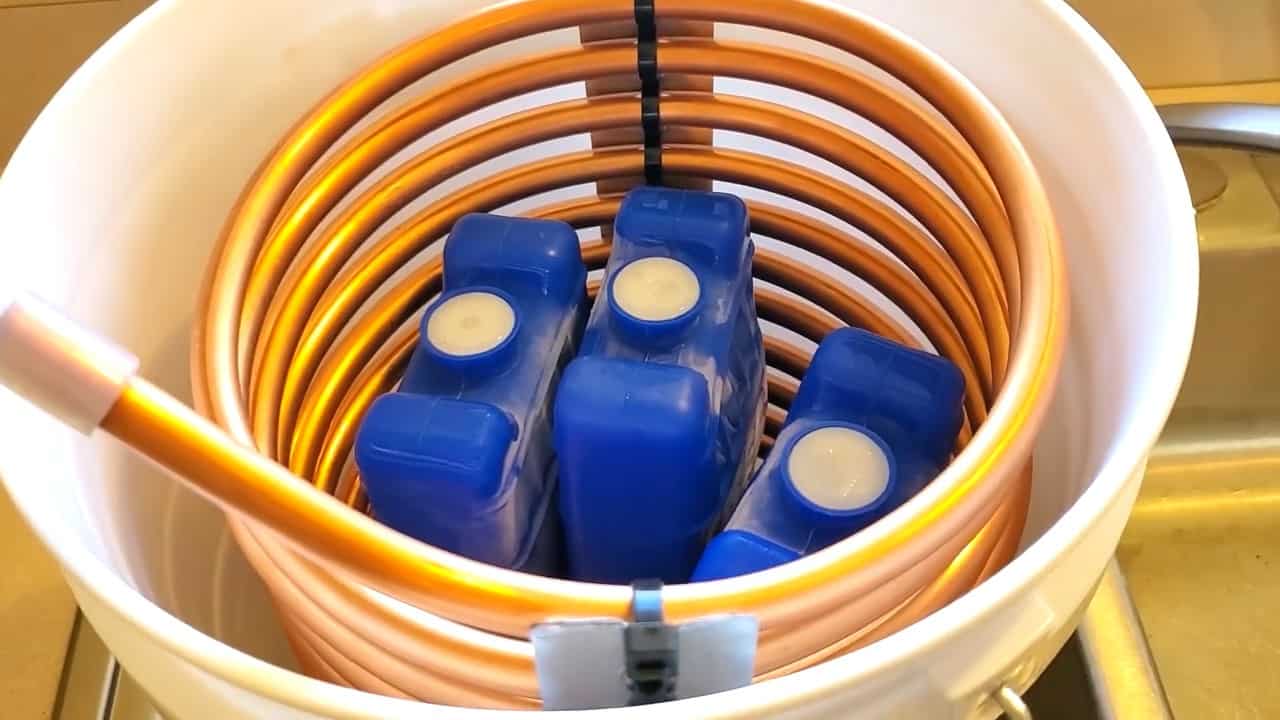
To improve the efficiency of the water distillation process, it’s necessary to add a cooling element to the condenser. One effective method is to fill the two-gallon bucket with ice water.
The ice water will cool the copper tubing much more effectively than air alone, and this will increase the efficiency of the distillation process.
By adding the cooling element to the condenser, it’s possible to condense almost all of the escaping steam into liquid water. This can be done by placing the coil carefully inside the bucket filled with ice water.
The tail end of the coil is pushed into the drain hole previously drilled in the bucket.
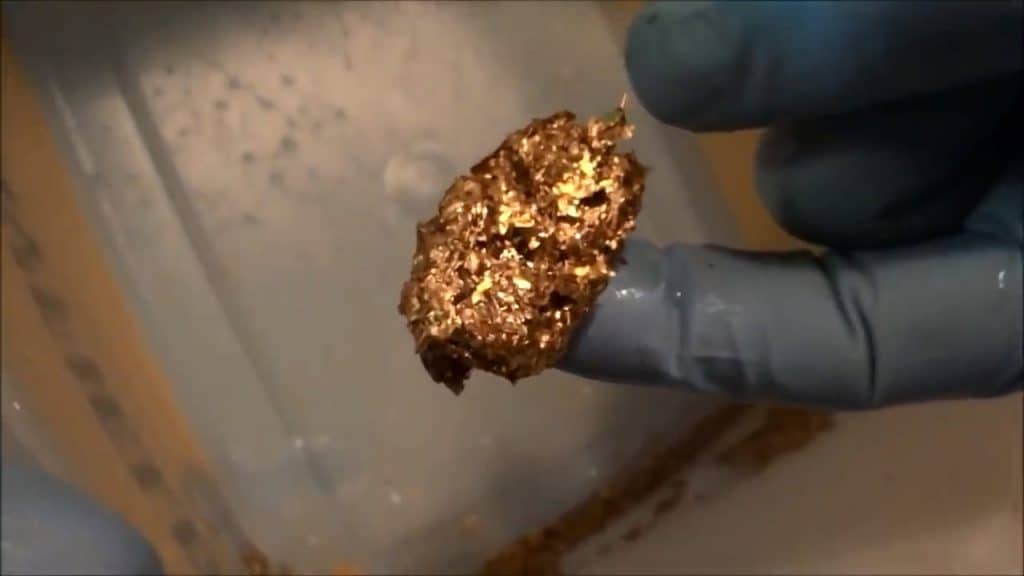
The addition of ice water to the bucket had an immediate effect. As soon as the steam was introduced, it condensed into liquid water.
By periodically adding cold water to the bucket throughout the distillation process, it was possible to maintain the temperature of the condenser and practically eliminate all of the steam waste coming out of the condenser.
When drilling the hole in the bucket for the copper tubing to pass through, it is important to ensure that the hole is not too big or too small.
If the hole is too big, the tubing will not fit securely, and steam will escape through the gap, reducing the efficiency of the distillation process.
On the other hand, if the hole is too small, the tubing will not fit, and the condenser will not work at all.
Therefore, it is recommended to drill the hole just big enough for the copper tubing to pass through without being too loose or too tight.
Once the tubing is passed through the hole, there will be a small gap between the tubing and the edge of the hole. This gap is left unsealed for two reasons.
Firstly, it makes it easier to remove the condenser from the bucket for cleaning and maintenance. If the gap was sealed, it would be difficult to remove the tubing without damaging the bucket.
This would make it challenging to clean the condenser and could potentially cause damage to the apparatus.
Secondly, the gap serves as a drain for the water that condenses on the outside of the tubing. As the steam passes through the tubing, it heats up the copper, which, in turn, heats up the surrounding water.
If the gap were sealed, the condensed water would not be able to escape, causing it to accumulate at the bottom of the bucket. This could potentially cause the water to become too hot, reducing the efficiency of the condenser.
In a survival situation, it is important to conserve resources and minimize waste. One way to do this is by setting the condenser over a larger bucket to collect and reuse the cooling water as it drains out.
This can be achieved by placing the condenser bucket above the larger collection bucket and attaching a tube to the drain hole of the condenser. The tube can then be directed into the larger bucket to collect the drained water.
By reusing the cooling water, you not only conserve a valuable resource, but you also improve the efficiency of the distillation process.
This is because the cooled water can be recirculated back into the condenser, further cooling the copper tubing and improving the condensation of the steam. In a survival situation, this can mean the difference between having enough clean drinking water or not.
It is important to periodically check the temperature of the cooling water to ensure it is still cold enough to efficiently condense the steam.
If the water becomes too warm, it should be replaced with fresh, cold water. Additionally, it is important to sanitize the collection bucket and tubing regularly.
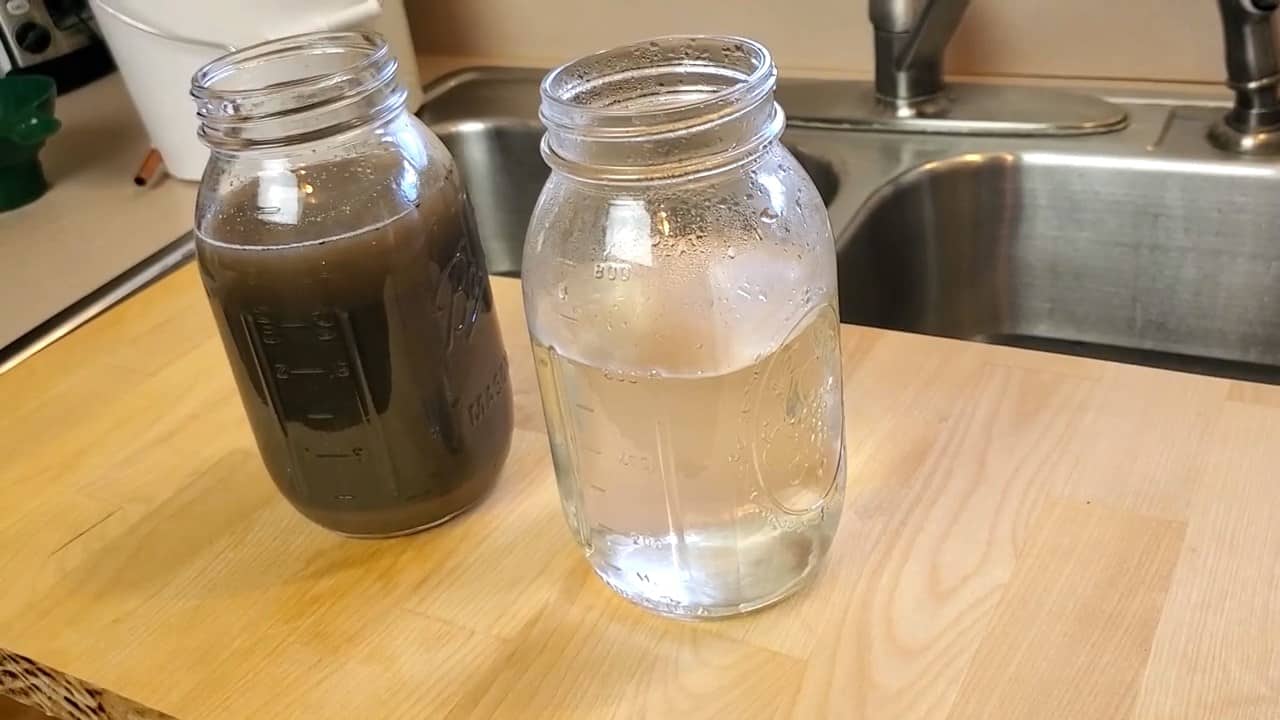
Image Credits : Great Lakes Prepping