The increasing demand for clean energy solutions has led to the development of off-grid solar backup systems, which offer reliable power without the need for a constant supply from the grid.
In this project, we will be building a powerful and portable off-grid solar power backup system that can provide a higher capacity than commercially available units at a fraction of the cost.
This system is designed to provide uninterrupted power supply to essential appliances such as a small refrigerator, charging stations for devices, LED lights, laptops, and even a TV.
With its compact size, the solar generator can be conveniently stored in your garage and easily transported wherever it is needed.
STEP 1 : MATERIALS REQUIRED
The main components used to build this generator are as follows.
These components include four Renogy 100 Watt 12 Volt Monocrystalline Solar Panels, which provide a steady flow of solar energy to the system.
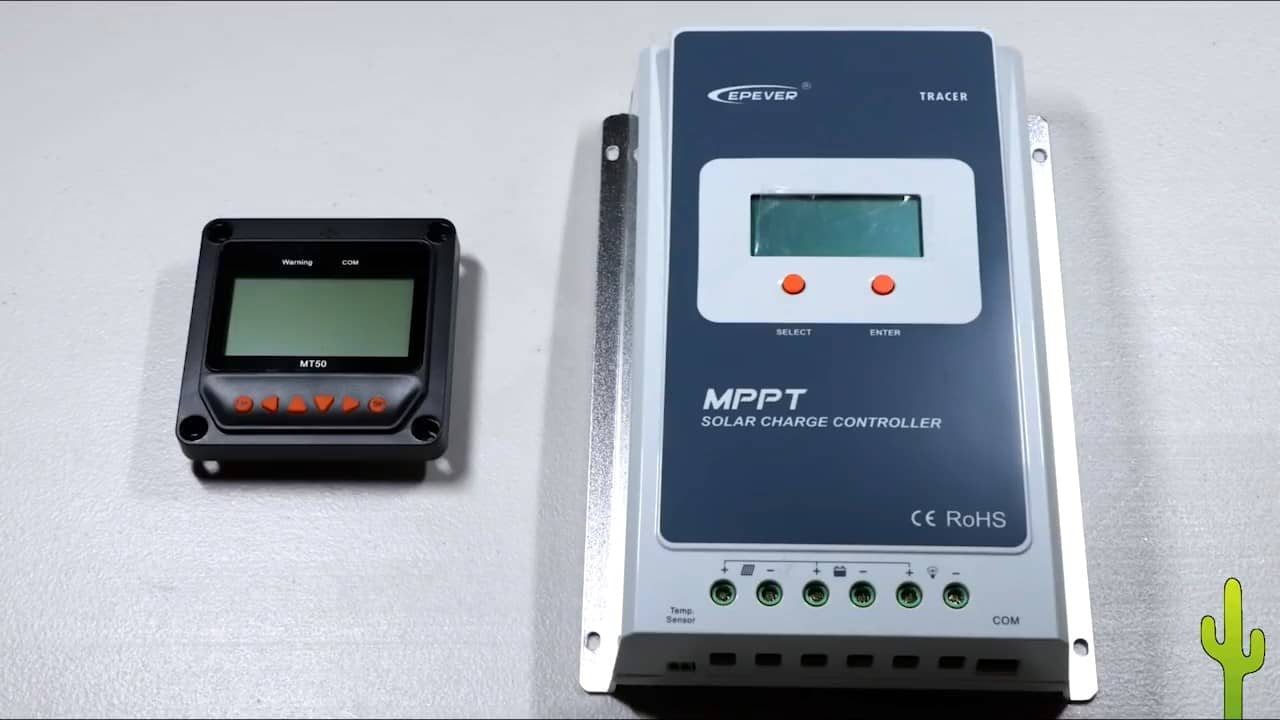
The panels are connected to a Renogy Rover 40 Amp MPPT Solar Charge Controller, which optimizes the charging process and maximizes energy conversion.
To store the energy generated by the solar panels, a Renogy Deep Cycle AGM Battery 12 Volt 100Ah was used. This battery is designed to withstand deep discharges and provide reliable power over an extended period.
A Sug 2000W (Peak 4000W) Power Inverter Pure Sine Wave DC 12V to AC is also included in the system to convert the DC energy stored in the battery into usable AC power for devices such as TVs, laptops, LED lights, and small fridges.
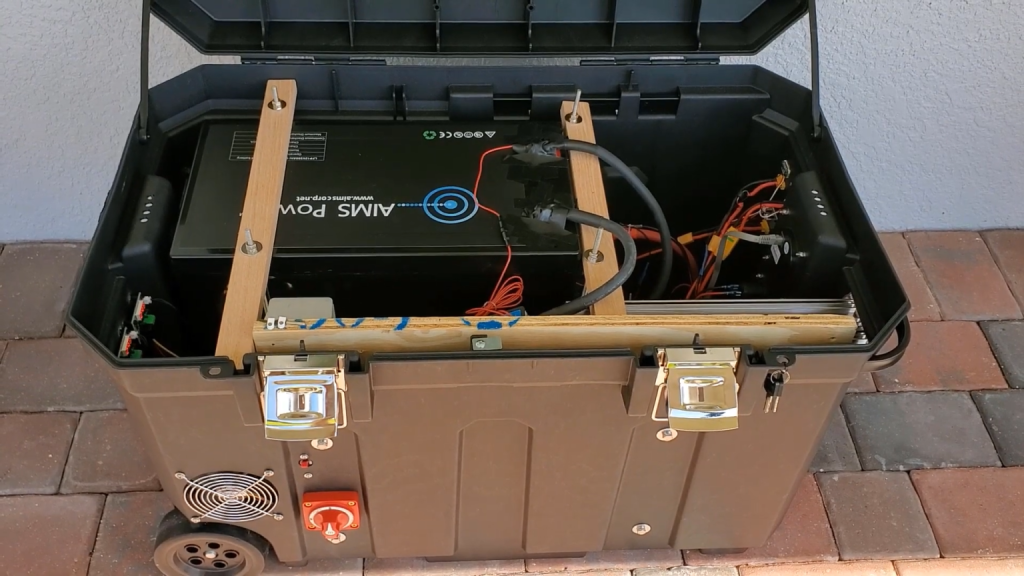
To connect all the components together, a Renogy 20 Feet 10AWG Solar Extension Cable with MC4 Female and Male was used. Additionally, a 6 Circuit Fuse Block W/Negative Bus was added for added safety and to protect the components from potential damage.
To ensure that the battery is always charged and maintained in good condition, a BLACK+DECKER BM3B 6V and 12V Automatic Battery Charger / Maintainer was included in the system. Finally, a control panel was added, complete with a USB charger, LED voltmeter, 12V power outlet, and ON-OF switch, to monitor and control the system easily.
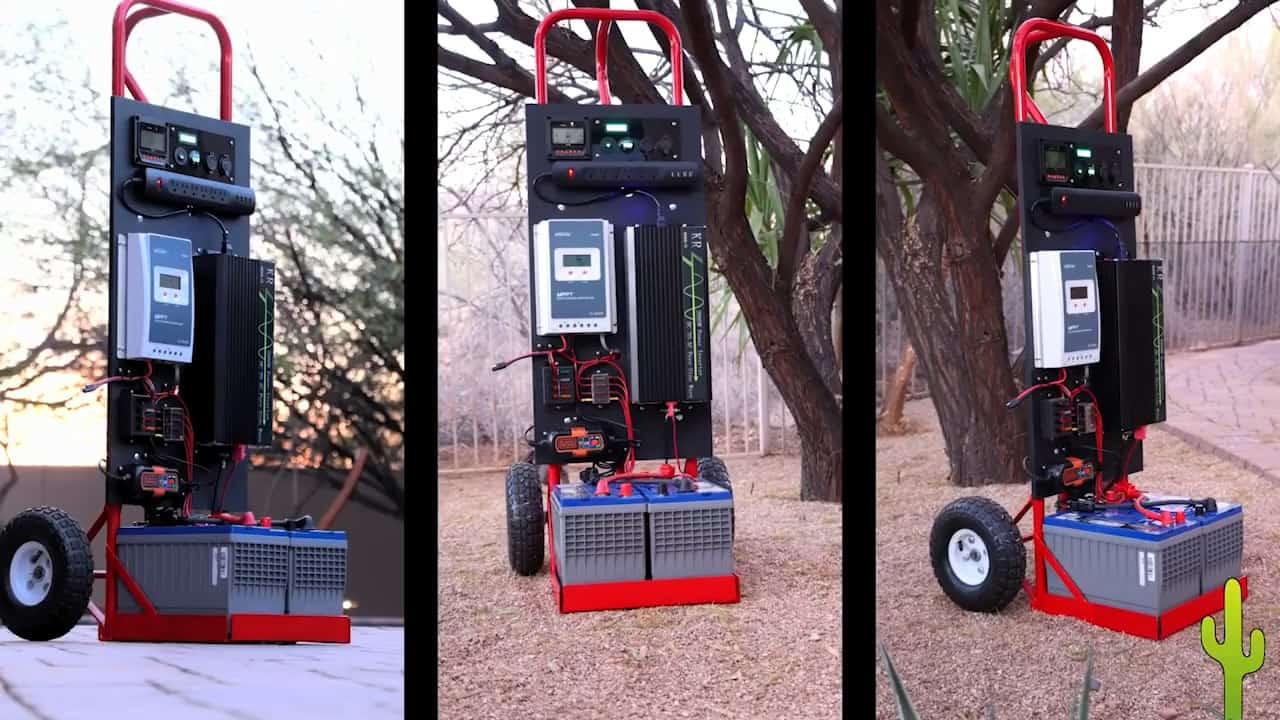
All of these components were mounted on a Milwaukee hand truck with a handle, making the entire system easily transportable and compact enough to be stored away in a garage or shed when not in use
STEP 2 : CALCULATING YOUR NEEDS
If you’re planning to create a solar power system to meet your energy needs, there are several factors you need to consider.
First, you must determine the power requirements of the devices you intend to power. You can do this by using a power meter to measure their energy consumption over a few days.
Once you have determined the power consumption of your devices, you need to calculate the number of batteries and solar panels required to power them.
This calculation should take into account the latitude of your location, as well as the weather conditions you are likely to experience throughout the year.
It’s also important to determine the reserve days of your system. This refers to the number of non sunny days that your system can continue to power your devices without recharging.
You should also calculate the recovery time, which is the number of days of sun required to fully recharge the batteries when they have been depleted due to lack of sun.
Another crucial factor to consider is the usable charging hours in a day, which will depend on the angle and direction of your solar panels, as well as any obstructions that may cast shadows on them.
Finally, you need to take into account the actual battery round trip efficiency, which is the amount of power the battery can give back compared to the amount used to charge it.
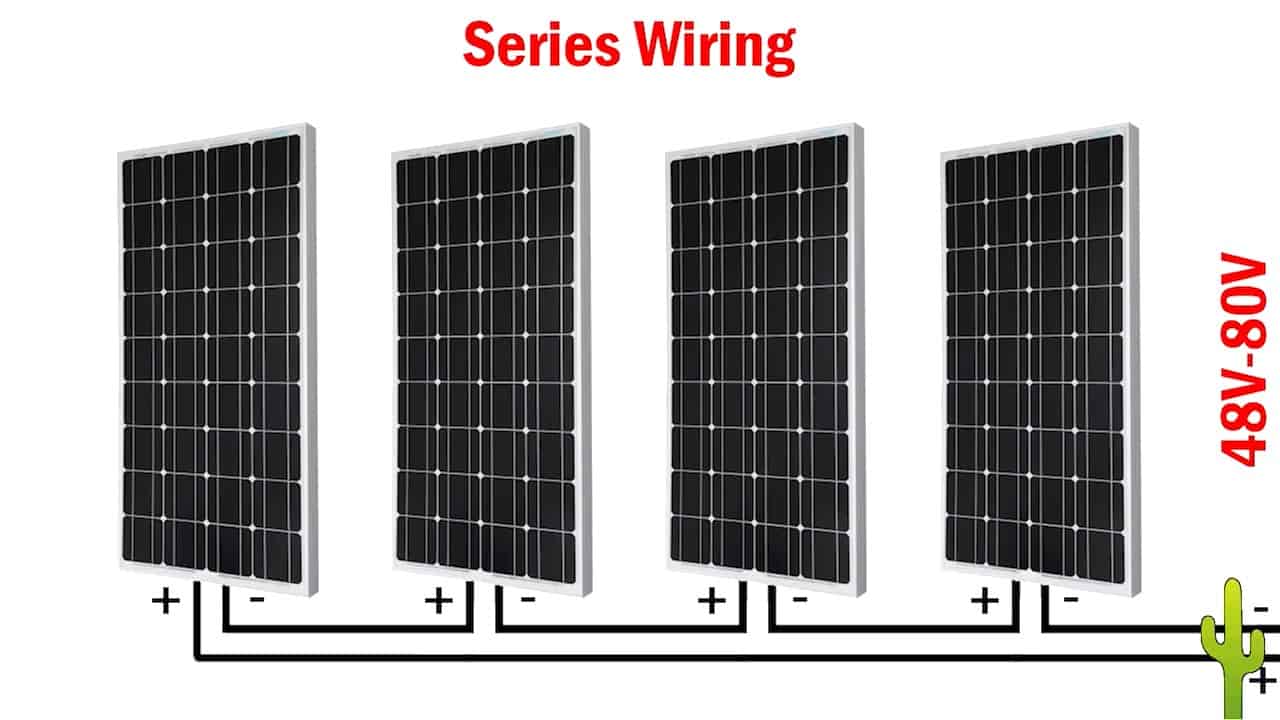
STEP 3 : CONNECTING THE PANELS IN SERIES
In this project, we utilize 4 Renogy 100 Watt 12 Volt Monocrystalline Solar Panels to power our off-grid solar generator.
These solar panels are wired in series, which means that the voltages add together to provide up to 80 volts from four panels.
This high voltage is advantageous as it allows for charging to commence as soon as there is any daylight, and it continues charging the batteries until dusk.
The series wiring configuration also has benefits for long wire runs. In cases where the solar panels are situated a considerable distance away from the generator, using larger wire gauges can be quite expensive.
However, with the series wiring configuration, it is possible to use smaller and more cost-effective wire gauges for the solar panel runs.
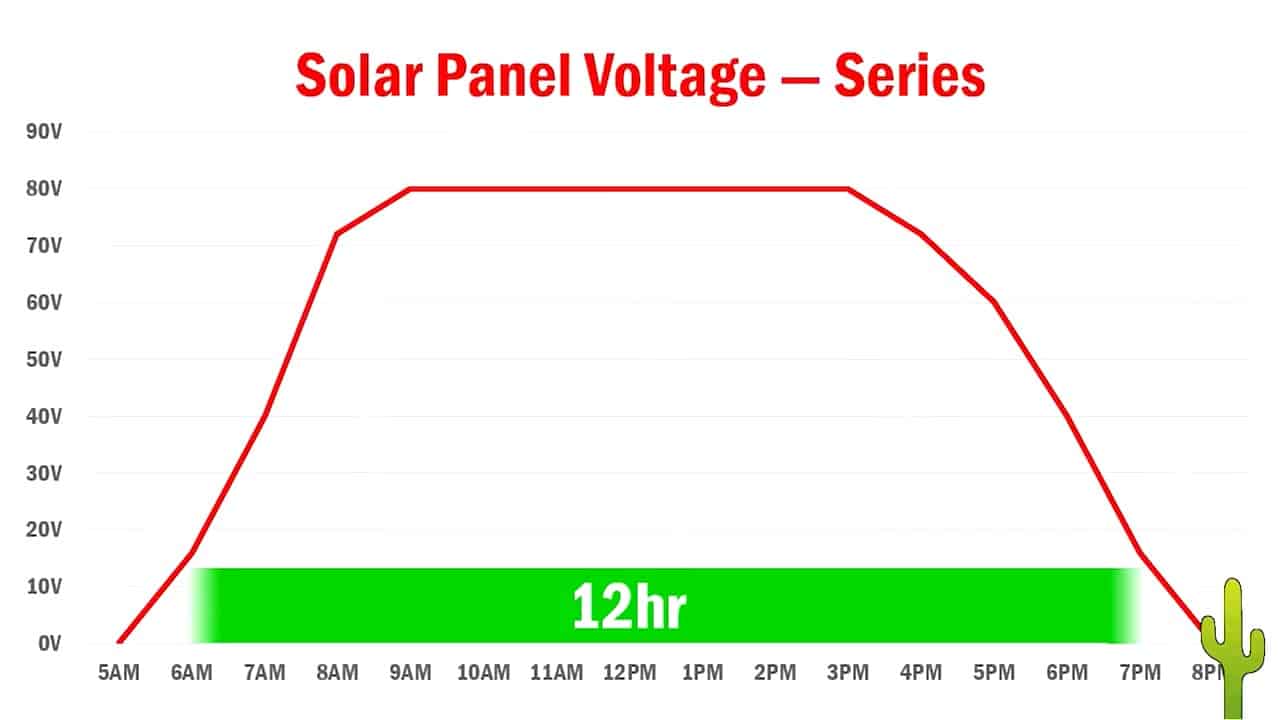
When using solar panels in series, it’s essential to have an MPPT (Maximum Power Point Tracking) charge controller. Unlike PWM (Pulse Width Modulation) charge controllers, MPPT controllers are designed to handle the high voltage of panels wired in series up to the controller’s voltage limit.
This feature makes it easier to charge the battery using a higher voltage, which can lead to faster charging times and increased efficiency.
One significant advantage of using an MPPT controller is that it can convert nearly all the energy coming from the panels into charging power for the battery.
This conversion is made possible by the controller’s ability to track the maximum power point of the solar panels, ensuring that the panels operate at their highest efficiency level, even when the conditions change.
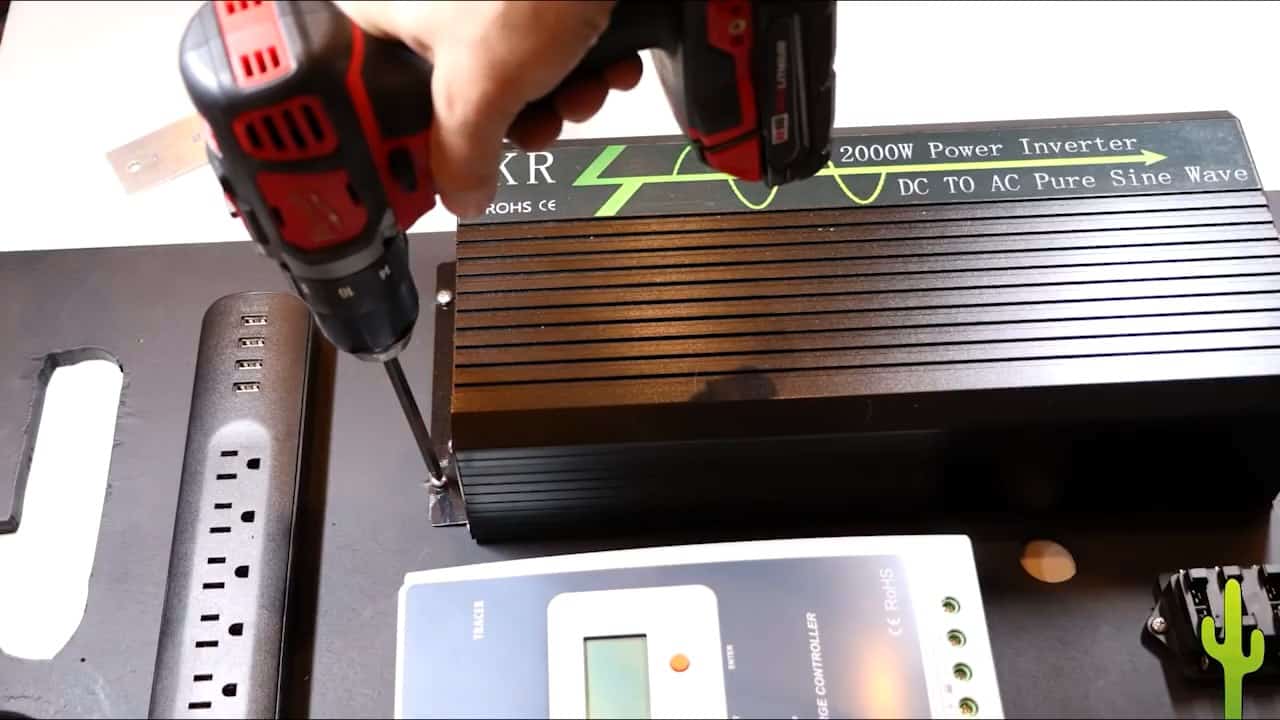
STEP 3 : ADDING INVERTER
In order to provide reliable and stable power to run any conceivable device, a 2000-watt pure sine wave inverter is used in this system.
The inverter is capable of providing up to 4000 watts of surge power, making it ideal for powering devices with high initial startup power requirements, such as motors.
This ensures that the system can handle any device that you may need to power, from small appliances to larger tools and equipment.
To store the energy generated by the solar panels, two 12V AGM marine batteries are used. These batteries are known for their durability and resistance to leakage, which makes them a perfect choice for an off-grid solar power system.
They are also designed to withstand cheaper discharges and have excellent round-trip efficiency, which means that they can store and release energy very efficiently.
The system is powered by four 100-watt solar panels that are connected through a 40 amp MPPT charge controller.
This configuration is capable of delivering up to 2400 watts of solar power on the shortest days of winter, ensuring that the system can still provide reliable power even in inclement weather.
The MPPT charge controller is specifically designed to convert solar power to charging power very efficiently, which ensures that the batteries are charged quickly and effectively.
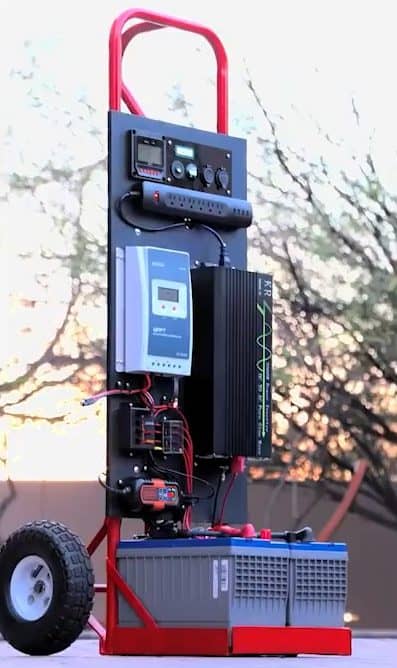
STEP 4 : LOADING COMPONENTS ON A HAND TRUCK
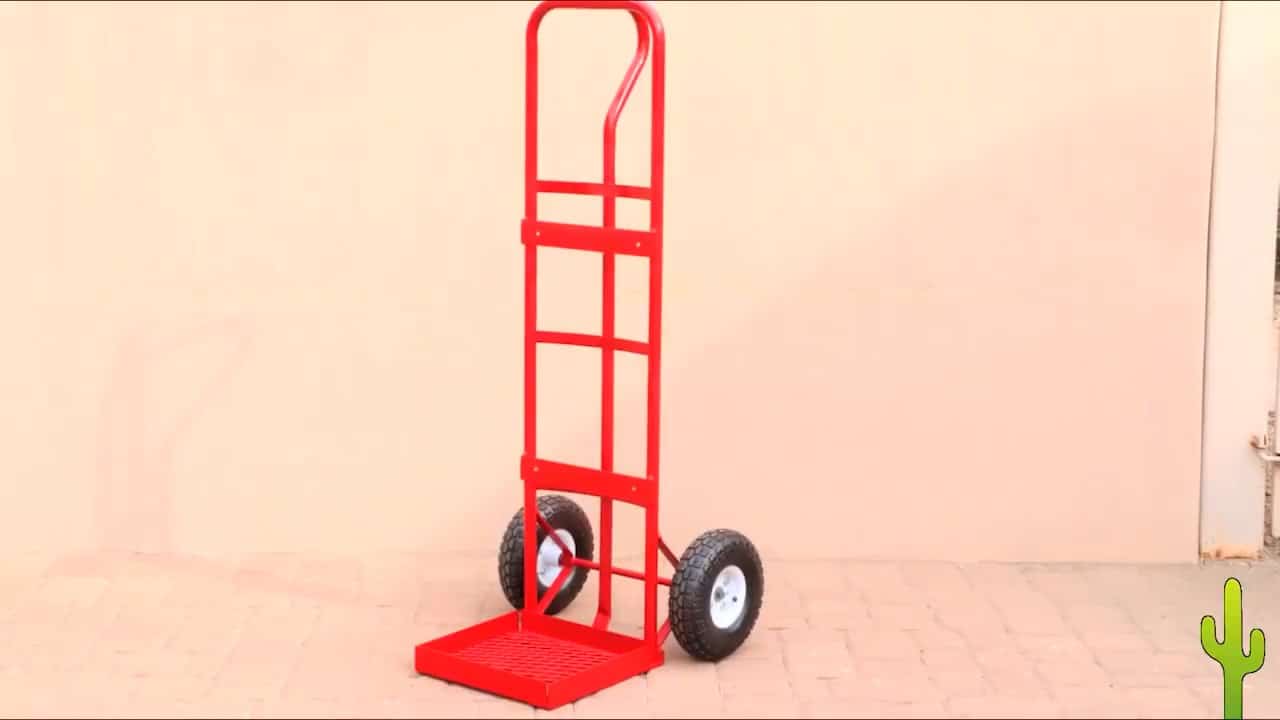
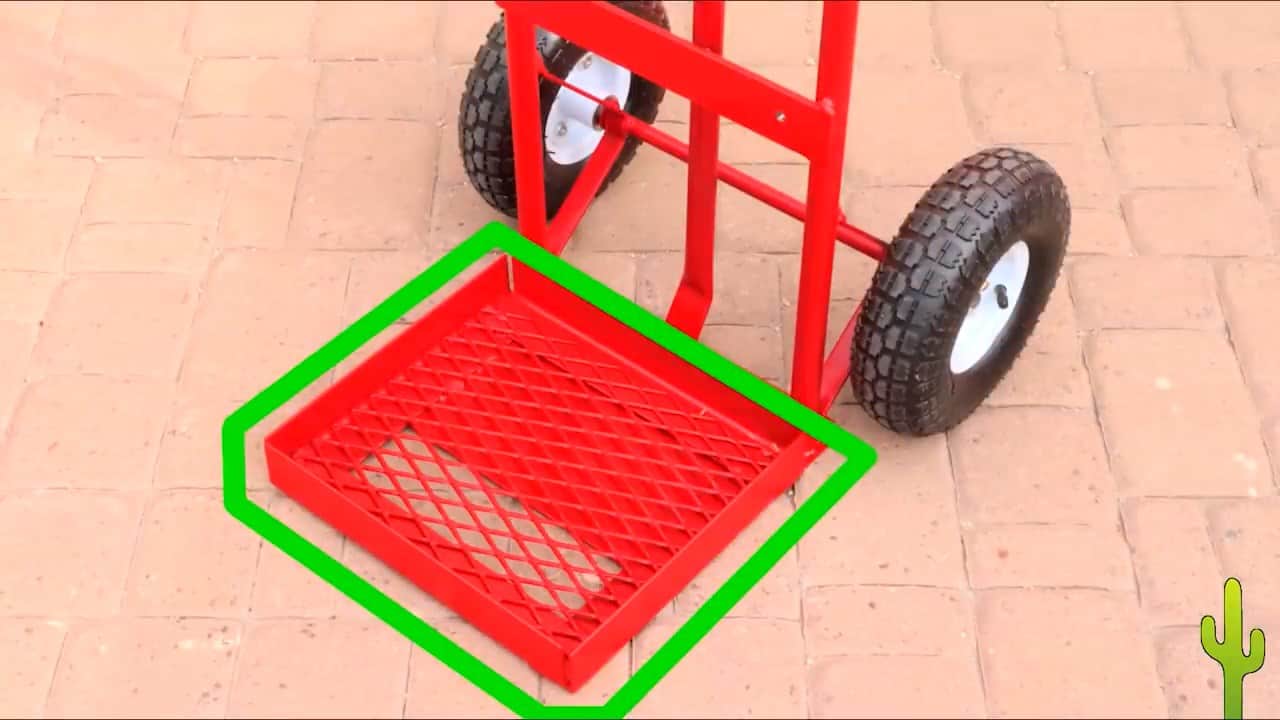
Transporting the solar power system can be a challenging task, but with the heavy-duty hand truck, it becomes much easier.
The hand truck is designed to handle the weight and size of the components, making it convenient to move the system from one location to another.
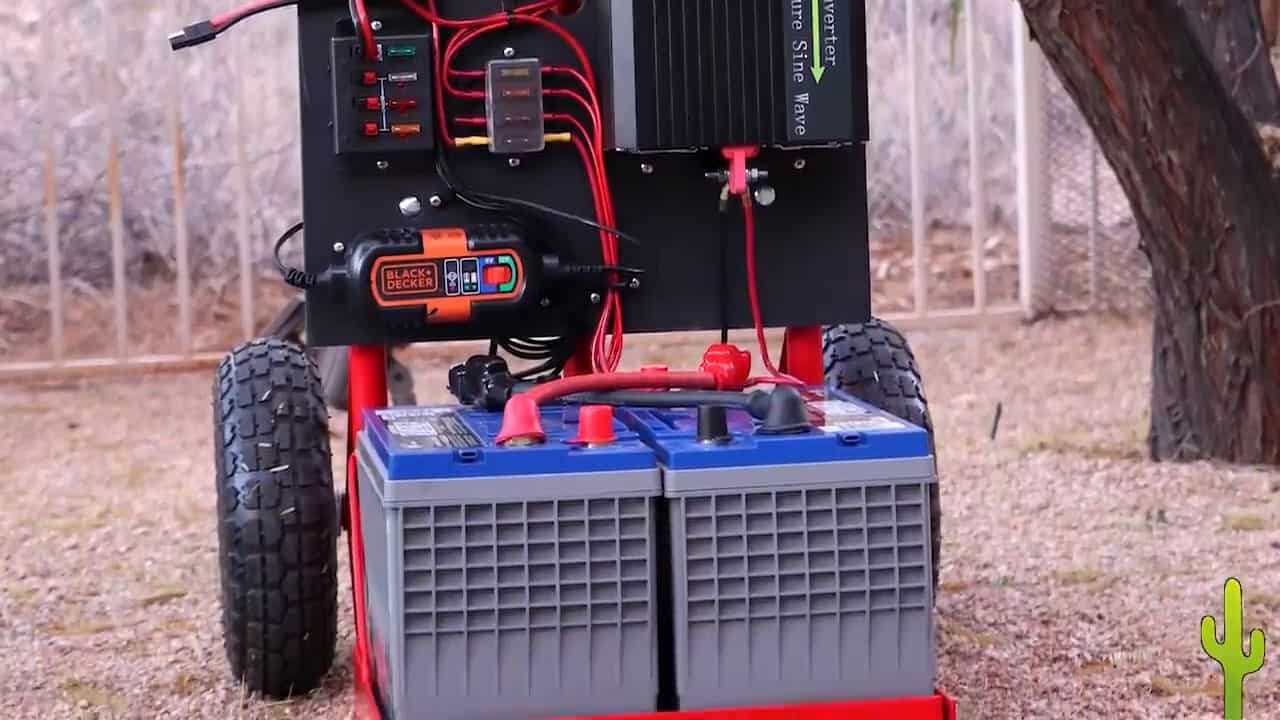
The A-frame made of angle iron is a sturdy structure that is welded onto the platform to mount the batteries. This ensures that the batteries are securely fastened to the hand truck and prevents them from shifting during transportation.
The angle iron also provides additional support and stability to the batteries, reducing the risk of damage
.
To further enhance the stability of the battery frame, two angled straps are welded across the truck. These straps help to distribute the weight of the battery evenly across the truck, making it more stable during movement.
This added support helps to prevent the battery frame from swaying or tipping over, minimizing the risk of damage to the system.
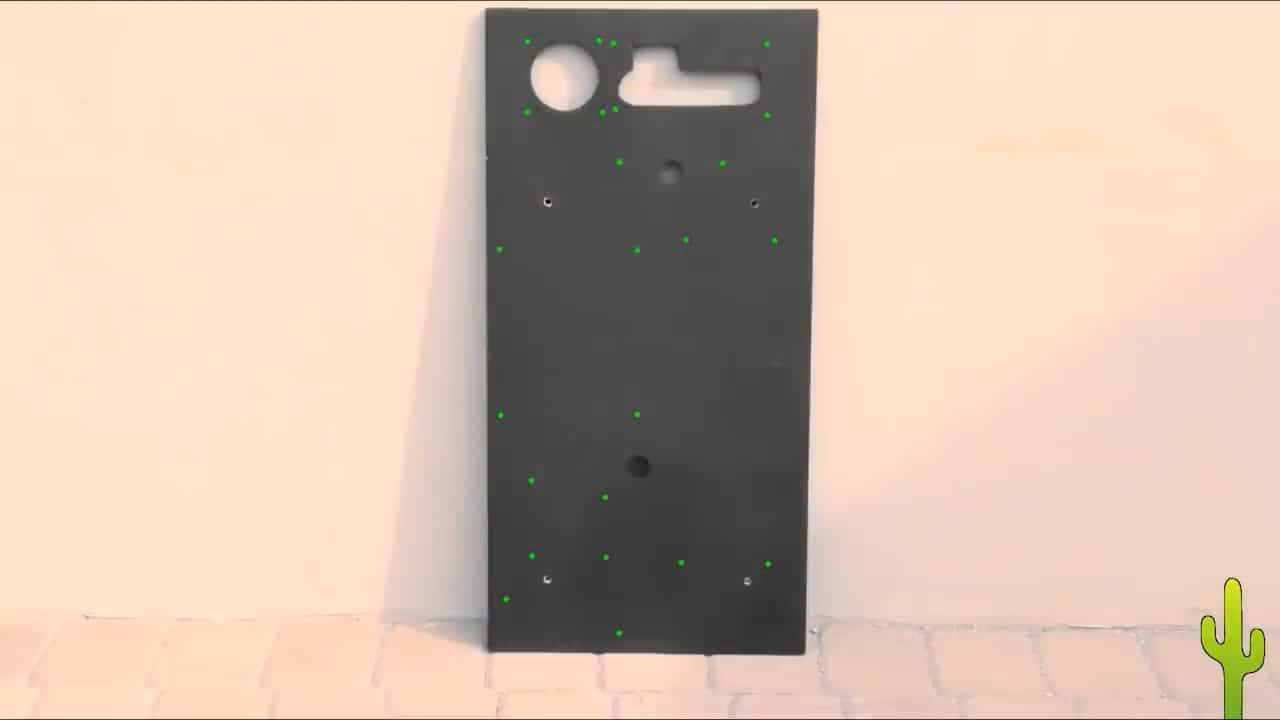
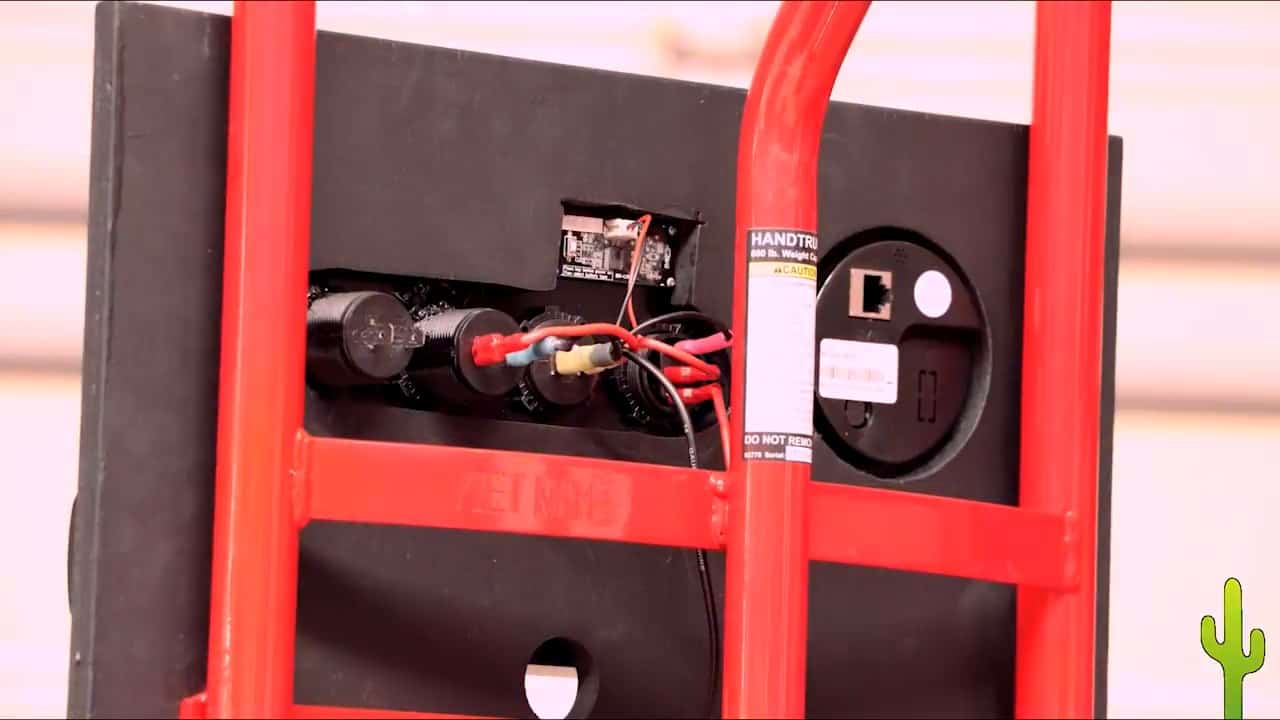
Mounting the various components of the off-grid solar generator onto the back support is a crucial step in the construction process.
The back support is typically made of sturdy five-eighth inch plywood that is strong enough to withstand the weight of the components and the rough handling associated with transportation.
To ensure that the components are firmly secured in place, it is recommended to use a tapered punch to make starter holes for all the screws that hold the components.
This helps to prevent the wood from splitting and ensures that the screws are securely anchored.
The hand cart is then laid on its back, and the plywood board is aligned in such a way that it doesn’t block the holes. Care should be taken to ensure that the components are positioned correctly and that there is enough space between them to allow for proper ventilation.
Once the components are in position, stainless steel screws are used to secure them to the back support. Stainless steel screws are preferred because they are corrosion-resistant and can withstand exposure to the elements, making them ideal for outdoor applications.
STEP 5 : WIRING THE SYSTEM
The use of appropriate wire gauges is crucial to ensure that the system functions optimally and safely. In this project, we have used an 18 gauge wire for the low current circuits, a medium 14 gauge wire for the 12-volt port, and a heavy 10 gauge wire for the high current charging circuits.
The colors used for the wires are also standardized, with red always connected to the plus or positive connectors, and black always to the minus or negative.
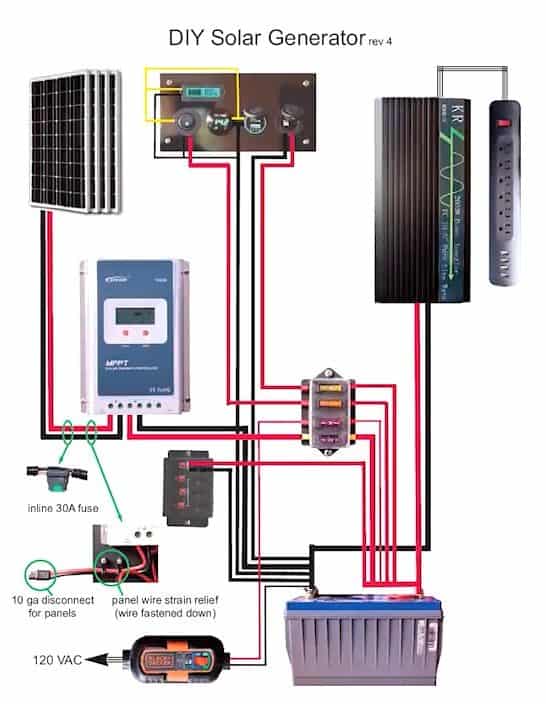
To connect the solar panels to the system, we use a quick disconnect Wire Harness SAE Connector, which ensures a secure and easy connection.
The positive and negative connections coming from the solar panels are then connected to the solar charge controller, which is responsible for regulating the amount of power that is being fed into the batteries.
The negative connection of the solar charge controller is directly connected to the negative connection of the battery, while the positive connection goes through a fuse block before connecting to the positive terminal of the battery.
This fuse block acts as a safety mechanism, preventing any potential damage caused by overloading or short-circuiting.
In addition to the solar panel and charge controller connections, other components in the system also require proper wiring to function correctly.
For low current circuits, we use a thinner 18 gauge wire to minimize resistance and power loss. This wire gauge is ideal for connections to switches, voltage displays, USB ports, and battery charge meters.
The negative connections for these components are connected via a medium 14 gauge wire to the battery negative terminal, while the positives are connected to the battery through the fuse block.
The 12-volt port is also wired separately with its own fuse and medium 14 gauge wire to ensure proper power delivery. This wiring ensures that the 12-volt port receives the correct amount of power and is protected from overloads that could damage the system.
The positive connection of the 12V Battery Charger is connected to the fuse in the fuse block, while the negative is connected directly to the battery. This ensures that the battery charger is protected from overloads and receives the proper voltage to efficiently charge the battery.
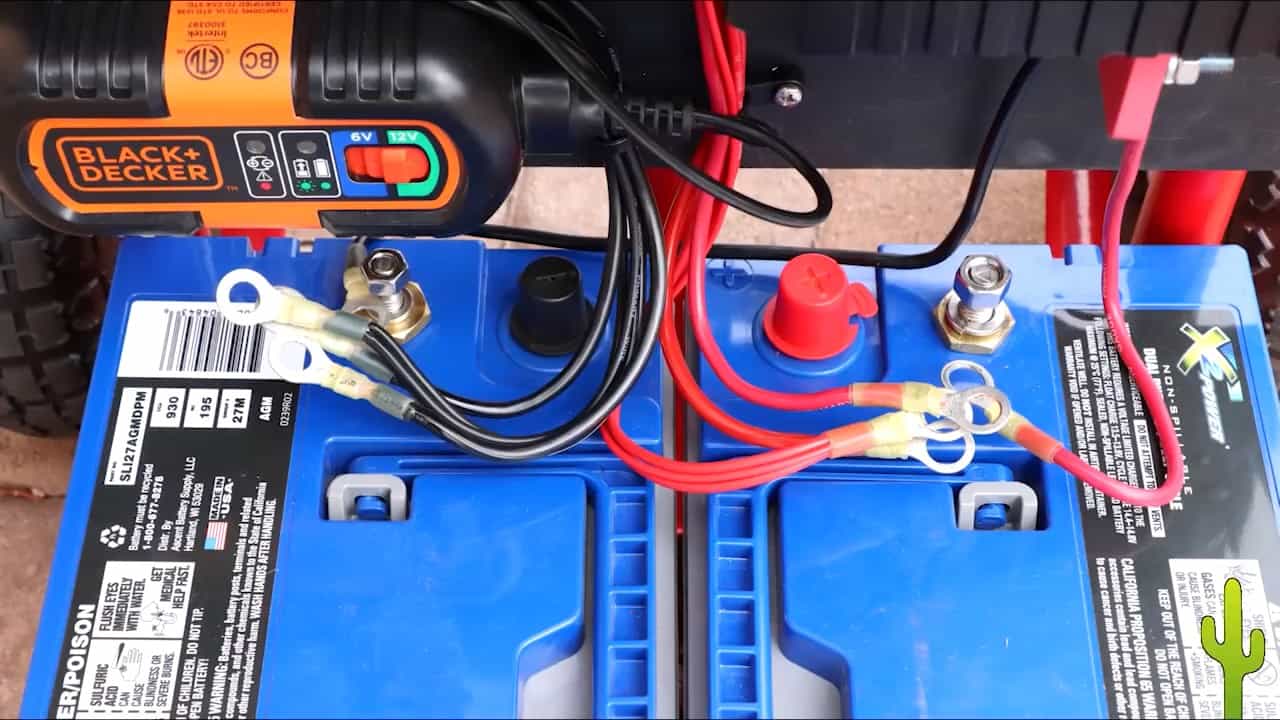
To ensure a proper connection, the batteries are carefully placed on the platform of the cart. They are positioned in such a way that the positive and negative terminals are facing in opposite directions.
This arrangement allows for the cables to be connected to the batteries without any crossing or confusion.
The batteries are firmly secured in place with brackets and straps to prevent any movement during transportation. The platform is made of a sturdy material that can support the weight of the batteries without any deformation.
Additionally, the platform has enough space around the batteries for ventilation to prevent overheating during charging and discharging
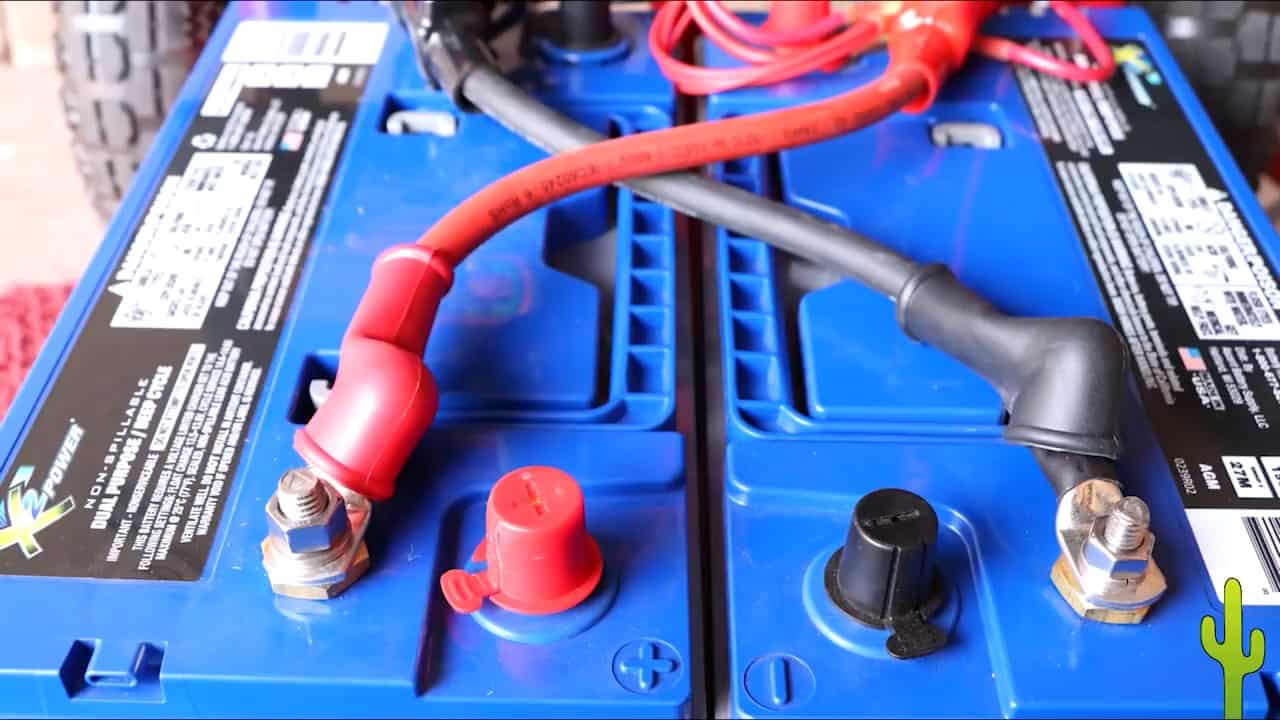
The battery connection cables are cross-connected to create a parallel 12-volt configuration careful to ensure the blocked cable is connected only to minus terminals at both ends and the red cable is connected only to plus terminals at both ends.
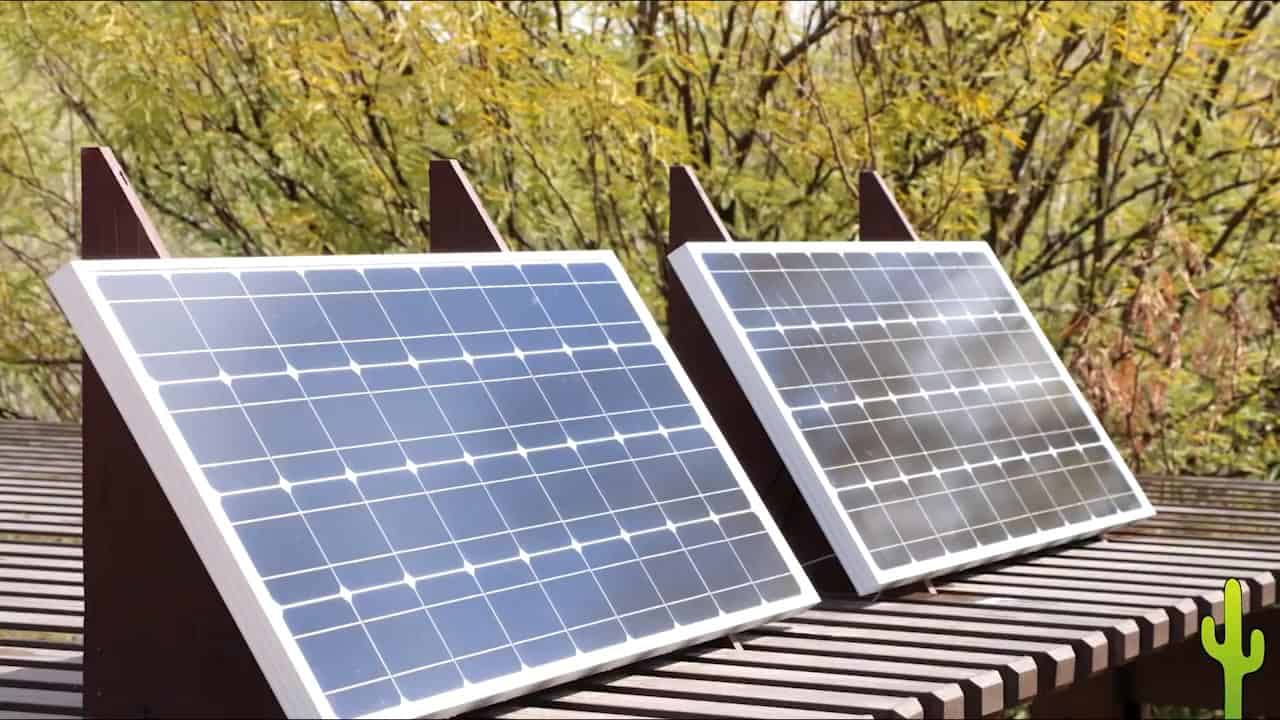
STEP 6 : SOLAR PANEL ORIENTATION
The orientation of the solar panels is crucial to ensure that they can receive the maximum amount of sunlight and generate the maximum amount of energy.
As the sun’s position in the sky changes with the seasons, it’s important to optimize the panel orientation to ensure the system operates efficiently throughout the year.
For instance, in the winter, the sun is lower in the sky, and the days are shorter, so it’s important to optimize the solar panels to get as much energy as possible during this time.
In this project, we use fixed solar panels, so we aim to point them due south and angle them to maximize exposure to the winter sun.
To determine the optimal vertical angle for the solar panels, we consult tables available online that provide information on the best tilt angle for different geographic locations
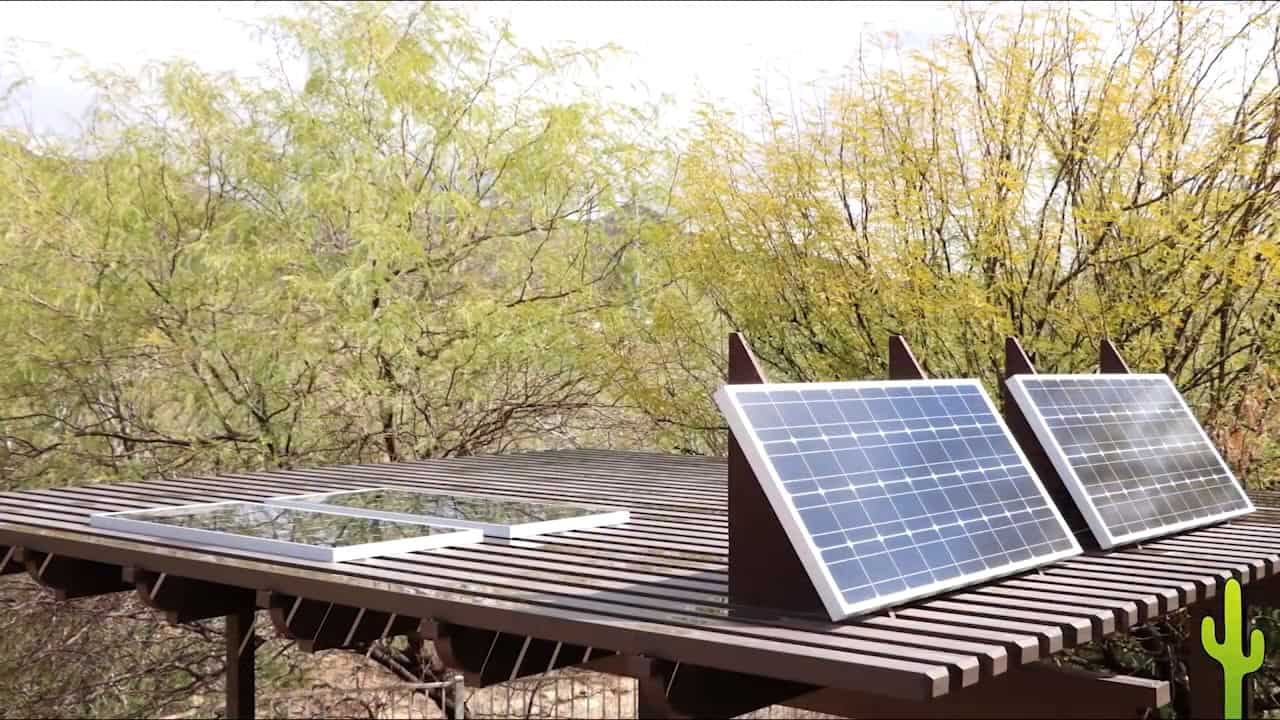
In the summer the sun is pretty much straight overhead, so the panels are optimal when laying flat. The angle panels are their most productive in the depth of the winter losing a little each day until the height of the summer as the sun is further off the winter angle.
Meanwhile, the flat panels are less efficient in the winter because the sun is at a low angle but gaining each day as the sun gets higher in the sky.
Image Credits : Desert Prep