Survival candles are a crucial tool for any outdoor enthusiast or emergency preparedness kit. In the event of a power outage or emergency situation, a reliable source of light is essential for safety, security, and comfort.
Unlike regular candles, survival candles are specifically designed to burn for long periods of time and to withstand adverse weather conditions.
One of the most popular types of survival candles is the waste oil or used vegetable oil candle. These candles are inexpensive to make and are a great way to repurpose old oil that might otherwise be thrown away.
They can burn for several hours and can be made using a variety of oils, including motor oil, vegetable oil, olive oil, and even lamp oil.
In addition to being an excellent source of light, survival candles can also provide heat and even cooking capabilities in an emergency situation.
They are compact and easy to store, making them an essential addition to any survival kit or bug-out bag.
Are you looking for a simple and inexpensive way to create a survival candle? Look no further than this guide on how to build a waste oil or used vegetable oil candle from an old nail polish bottle.
This versatile candle can be fueled with a variety of oils, including motor oil, olive oil, and lamp oil.
STEP 1 : MATERIALS REQUIRED
To make an oil candle, you will need a few supplies to get started. Firstly, you will need a reservoir to hold the oil. A small and clear fingernail polish bottle works perfectly for this purpose.
Next, you will need a length of 100% cotton yarn that is slightly longer than the bottle. It is important to use cotton yarn as it absorbs the oil effectively and burns steadily. You can use any color of yarn that you prefer, but be sure that it is 100% cotton.
To complete the setup, you will need a one-inch square piece of aluminum foil. This will be used to create a small dish for the yarn to sit on and help it absorb the oil more efficiently.
Be sure that the foil is free from any wrinkles or folds as this can cause the oil to pool in certain areas and make the candle burn unevenly.
STEP 2 : PREPARING THE BOTTLE
Once you have the bottle, make sure to clean it thoroughly to remove any residual nail polish or debris.Next, select the type of fuel you want to use for your candle.
There are several options to choose from, including vegetable oil, waste motor oil, corn oil, and olive oil.When selecting your fuel, keep in mind that different types of oil will have varying burn times and scents.
When pouring the oil into the bottle, be sure to leave a small amount of space at the top to prevent the oil from overflowing when the wick is lit. It’s essential to note that you don’t need to fill the entire bottle with oil.
A half-full bottle is enough for a small candle that will burn for several hours.
STEP 3 : INSTALLING THE COTTON WICK
After filling the bottle with oil, select a length of 100% cotton yarn that is slightly longer than the bottle’s height. You can use any cotton string or wick you have on hand as long as it is 100% cotton.
Cotton wicks are preferred for oil candles because they are absorbent and burn cleanly.
To prepare the wick, take a one-inch square piece of aluminum foil and fold it lengthwise in half to form a strip. This strip will serve as the base for your wick.
Next, using a sharp object like a needle or a pin, make a small hole in the center of the foil strip. This hole will serve as the passage for the wick to pass through.
Once you have the cotton wick threaded through the aluminum foil, it’s time to lower it into the bottle. Gently insert the wick into the bottle until the aluminum foil rests on top of the bottle’s opening.
Next, you need to secure the aluminum foil around the bottle’s neck to prevent any oil from spilling out. To do this, carefully fold the edges of the foil down around the neck of the bottle. Make sure the edges are tightly sealed to avoid any leakage.
As the foil acts as a lid for the bottle, it should be snugly placed around the bottle’s neck. Check to ensure there are no gaps or openings around the edges of the foil that could allow oil to escape.
STEP 4 : WARMING UP
After assembling the oil candle, it is important to check the cotton wick and ensure that it is fully saturated with oil.
If the wick appears to be dry, carefully turn the candle upside down for a minute, allowing the oil to flow into the wick and saturate it. It is important to be cautious during this step to avoid dislodging the aluminum foil lid that covers the bottle’s opening.
If the cotton wick is slightly longer than the height of the bottle, gently pull it up a bit to expose the wet part of the wick. Using a pair of scissors, trim the wick to a suitable length, leaving a small portion exposed above the aluminum foil lid.
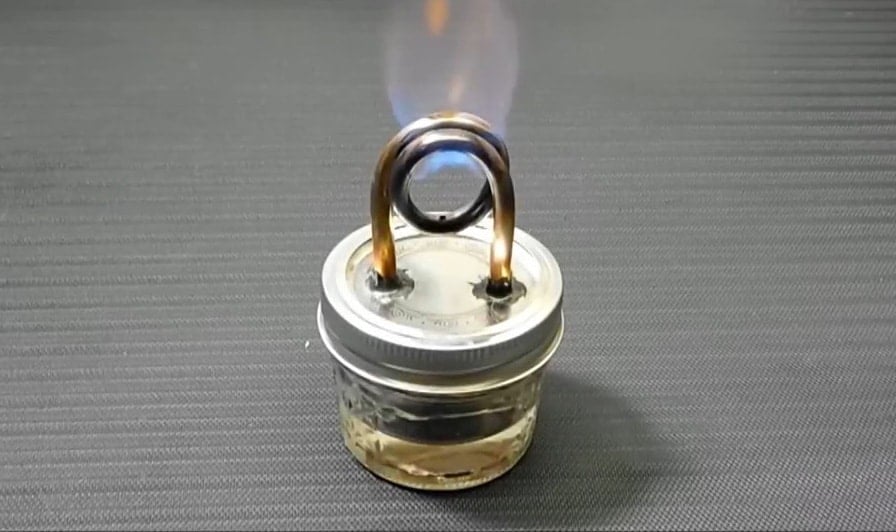
To light the candle, use a lighter or a matchstick to ignite the exposed end of the wick. As the flame catches onto the wick, it may take a moment for the oil to heat up and start to flow up the wick, so be patient.
It is essential to ensure that the wick is fully saturated with oil before lighting it, as a dry wick can result in a short burn time and a weak flame.
When lighting the candle, take care to not use a thick layer of aluminum foil for the lid. A thin layer of aluminum foil is sufficient to act as a lid, and a thick layer can cause the foil to heat up quickly and potentially catch fire. Once the flame has caught onto the wick, the candle should burn steadily for several hours.
Image Credits : JIUJITSU2000