A radiant floor hydronic heating system is a highly efficient and effective way to heat up your garage or any other room in your home or office.
Unlike traditional heating systems that rely on blowing hot air through vents, a radiant floor system uses the floor as a thermal mass, distributing heat evenly throughout the space.
This provides a comfortable and consistent temperature that can be easily controlled using a thermostat.
The installation process of a radiant floor system is relatively straightforward and can be done as a DIY project with the right tools and materials. PEX tubing is a popular choice for radiant floor systems as it is flexible, durable, and resistant to corrosion.
The tubing is laid out in a serpentine pattern on the floor, and hot water is circulated through it using a pump and a boiler or water heater.
Apart from the comfort benefits, radiant floor heating is also energy-efficient, as it operates at lower temperatures than traditional heating systems. This means you can save on energy bills while enjoying a warm and cozy space.
In this project, we will take you through the step-by-step process of installing a homemade radiant floor hydronic heating system for your garage.
STEP 1 : DETERMINING THE PEX TUBING SIZE
Before beginning the installation of your radiant floor heating system, it is essential to determine the appropriate size of the pex coil tubing and water heater needed.
This will depend on various factors, including the size of the room or garage, the desired temperature range, and the heat exchange capacity of the concrete floor.
To calculate the total heat required, you need to determine the square footage of the space that needs to be heated.
Once you have this information, you can use a BTU calculator to estimate the number of BTUs per hour required to heat the area. This calculation will help you choose the correct size of the pex coil tubing and water heater.
Additionally, you need to consider the length of tubing required to exchange enough heat into the concrete floor to warm up the entire space. This will depend on the spacing of the tubing and the thickness of the concrete slab.
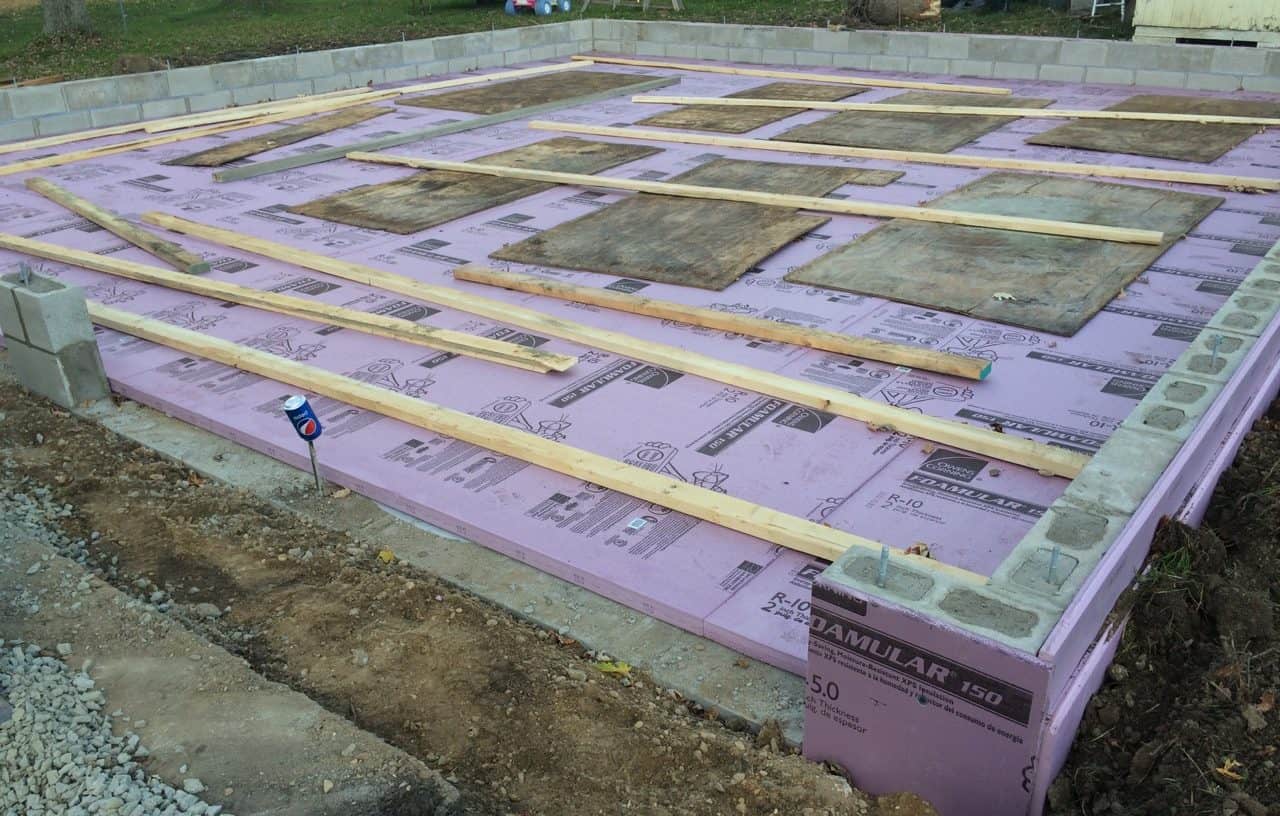
STEP 2 : LEVELLING THE GROUND
To ensure that the radiant floor heating system functions efficiently, the installation process must begin with preparing the ground properly. This involves leveling the ground to create an even surface for the flooring.
Next, a vapor barrier made of 6 Mil Visqueen plastic PE film is laid on top of the leveled ground. The vapor barrier is essential in preventing moisture from the ground from rising to the surface of the floor, which can cause the flooring to deteriorate over time.
After the vapor barrier is in place, a mixture of sand and packing gravel is spread evenly across the ground. This mixture helps to provide a sturdy foundation for the next layer.
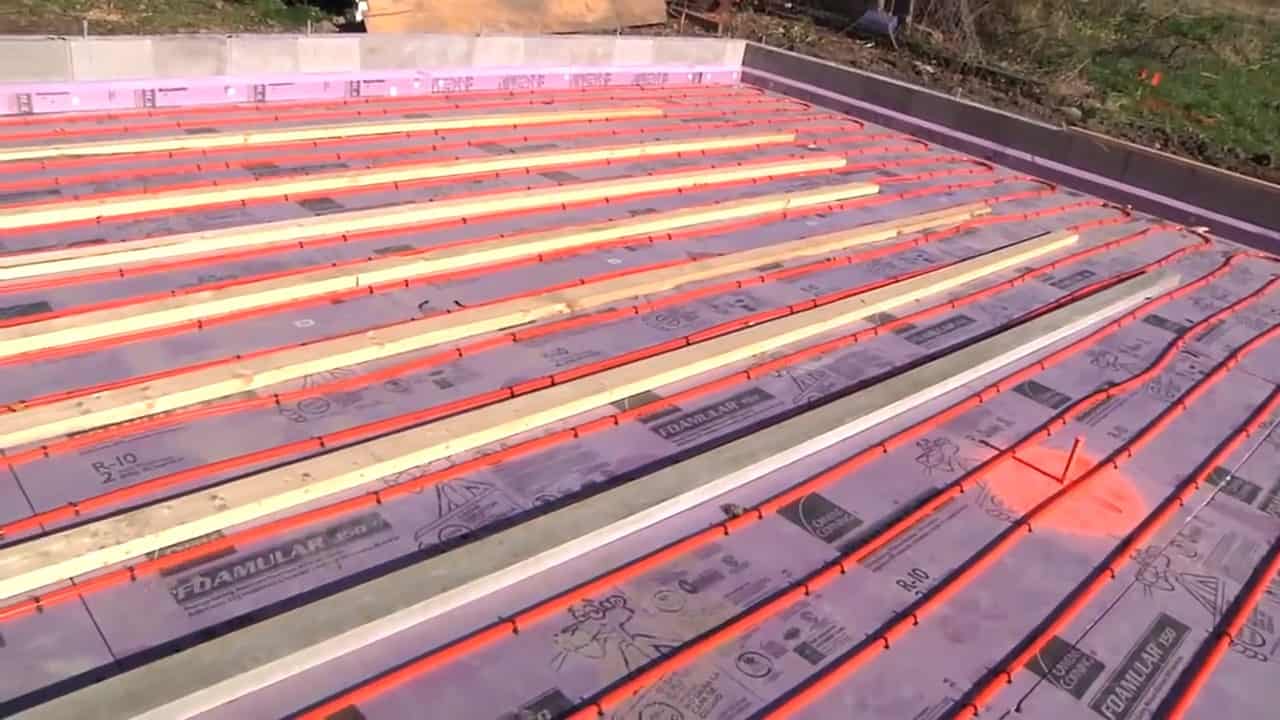
The next step involves installing a two-inch extruded insulating polystyrene foam on the floor and around the perimeter of the garage or room. This insulation layer is essential in preventing heat loss through the ground, which can cause the heating system to be inefficient and increase energy costs.
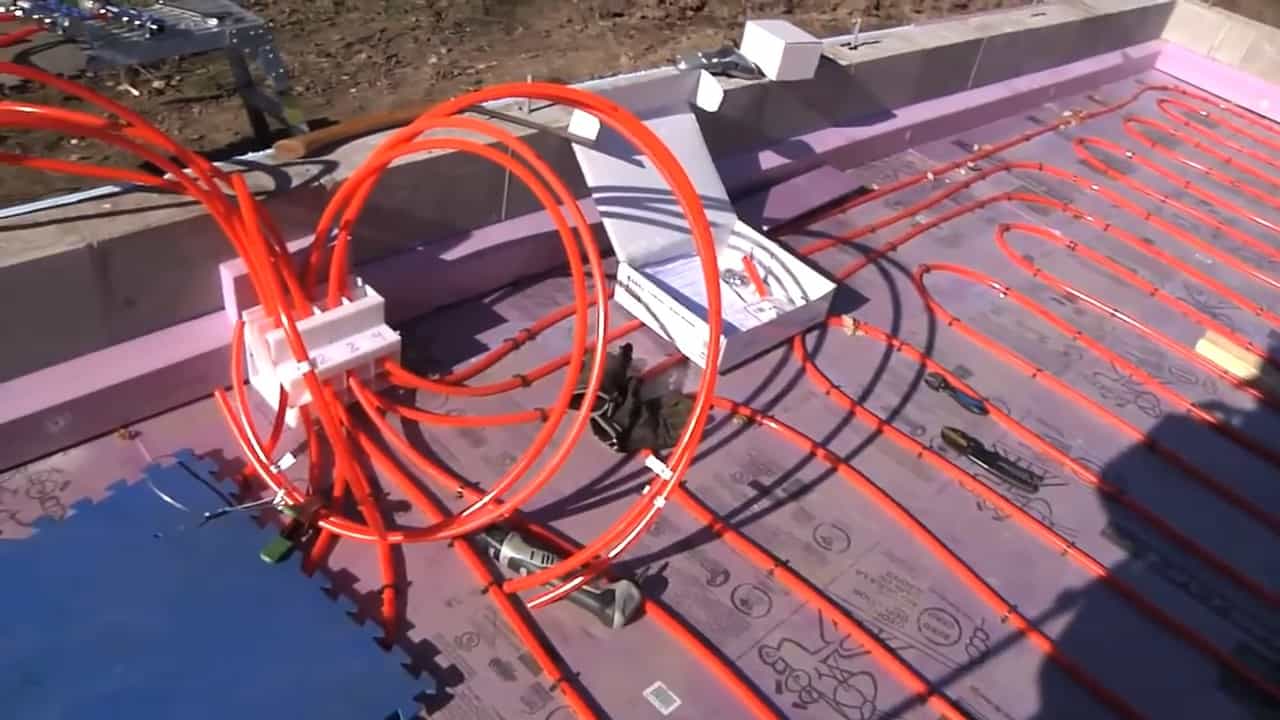
STEP 3 : INSTALLING THE PEX TUBING
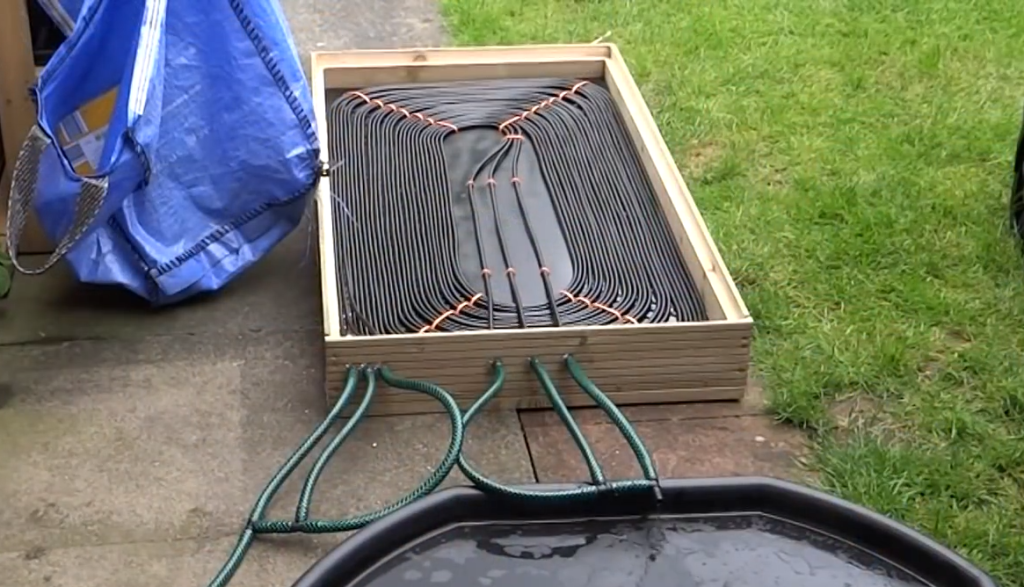
To ensure even distribution of heat throughout the space, we begin by stapling down four circuits of 800 ft half-inch Pex tubing onto the two inches of polystyrene insulating foam using a Pex stapler.
The Pex tubing should be spaced out evenly to avoid any cold spots.
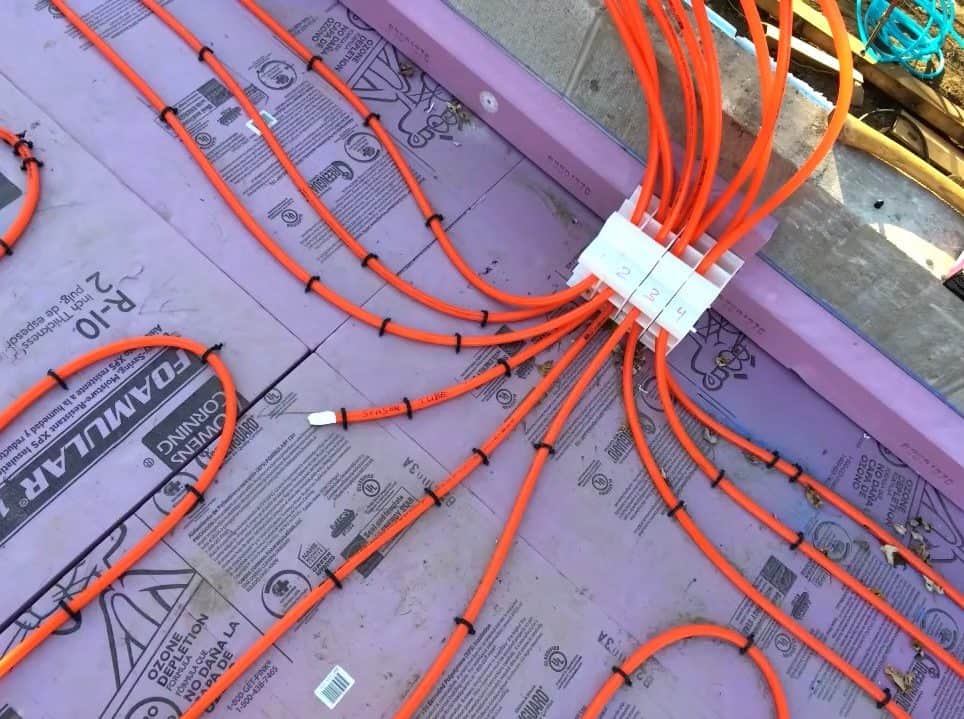
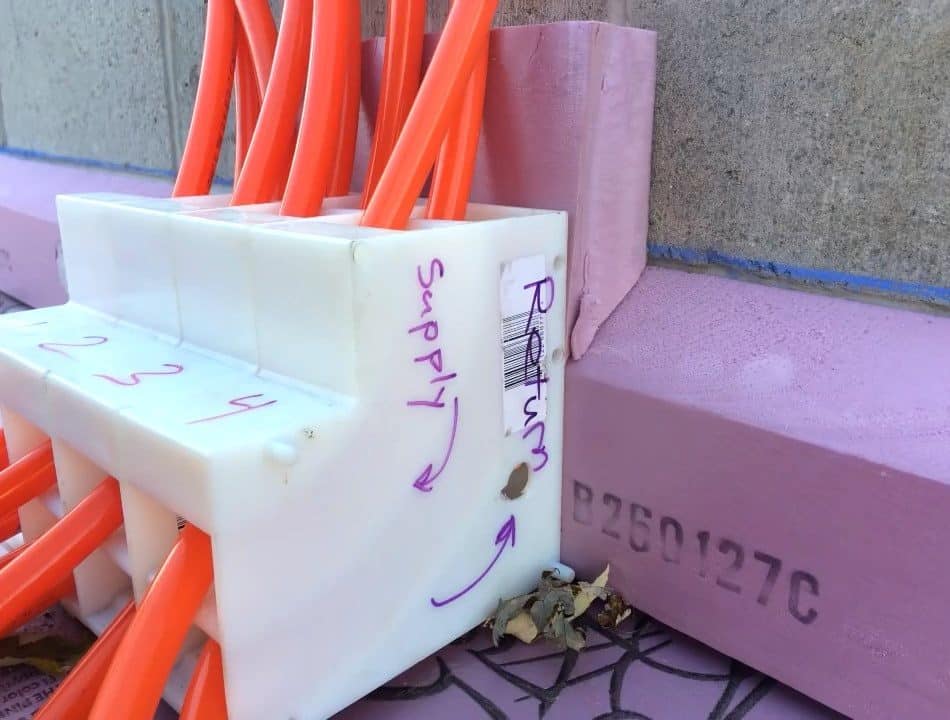
Next, the eight tube ends are carefully routed up to a central box which will act as the connection point for the tubing to the manifold.
The box should be located in a convenient location for access, and also allow for easy connection to the supply and return pipes that will deliver the hot water to the tubing.
Once the tubing is in place, the manifold can be mounted onto the wall. The manifold is a distribution system that controls the flow of hot water into the tubing.
It has several ports where the Pex tubing is connected to the supply and return pipes using compression fittings.
When connecting the Pex tubing to the manifold, it is important to ensure a tight seal to prevent any leaks. We recommend using a compression fitting which provides a secure and reliable connection
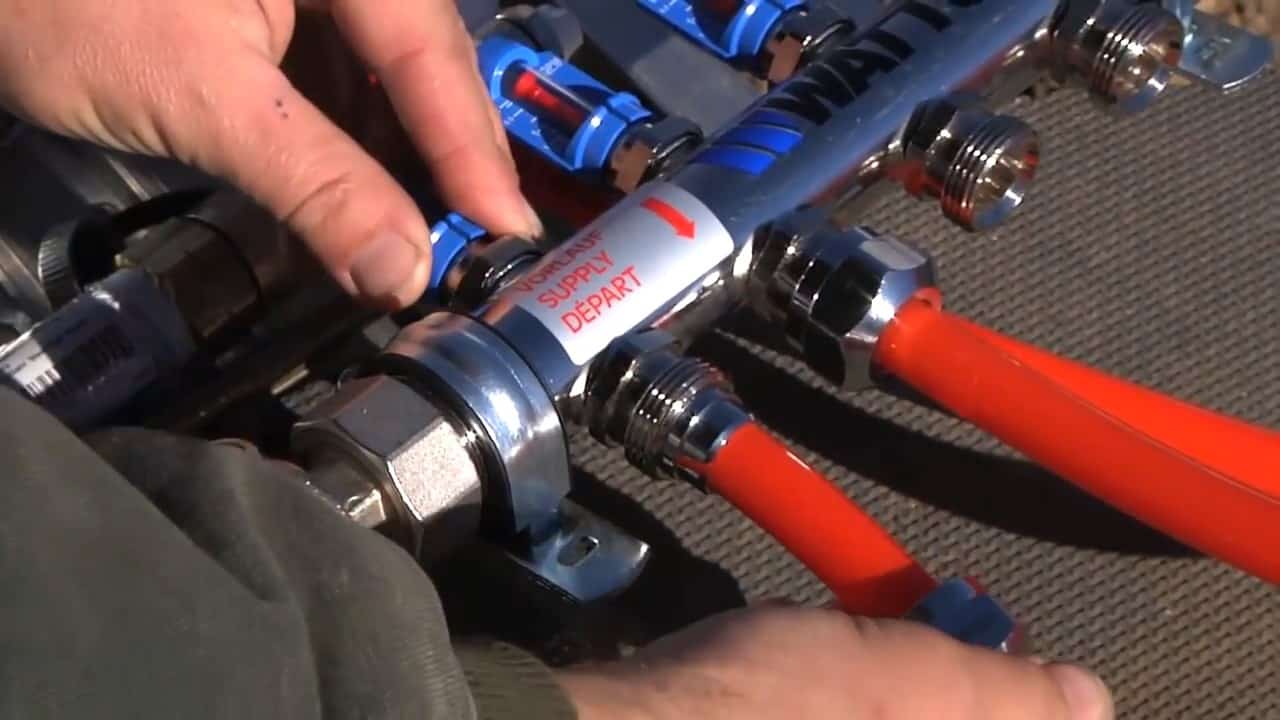
Before proceeding to pour the concrete, it’s essential to ensure that the connections of the PEX tubing are tight and secure. To do this, we use a 100 PSI air pressure gauge to conduct a pressure test on the manifold.
This test will help detect any leaks or holes in the system, which can be fixed before pouring the concrete.
Once the pressure test is complete, we can start pouring the concrete over the PEX tubing circuits. It’s important to pour the concrete at a minimum thickness of 5 inches, ensuring adequate heat transfer between the tubing and the concrete slab.
To prevent cracking due to shrinkage during the curing process, saw cuts are made into the concrete. The cuts should be less than an inch in width and made at intervals of four to six feet, depending on the size of the room or garage.
These saw cuts allow the concrete to shrink and expand without cracking and also serve as expansion joints for the concrete.
To ensure that the hydronic heating system works efficiently and effectively, it is crucial to insulate the pex tubing and prevent any water from entering the floor.
For this purpose, an expanding foam sealant is used to fill the junction where the concrete meets the supply and return tubing near the manifold.
The expanding foam sealant serves as an insulation barrier and provides an airtight seal around the tubing. It prevents air leaks and keeps the heat circulating within the system.
This sealant also protects the tubing from any moisture or water that may seep through the concrete.
During the application process, the foam sealant is carefully injected into the gaps between the concrete and the pex tubing. The sealant expands and fills in all the gaps and crevices, creating a solid and robust seal around the tubing.
After the sealant has dried and cured, any excess foam can be trimmed off to ensure a smooth and even surface.
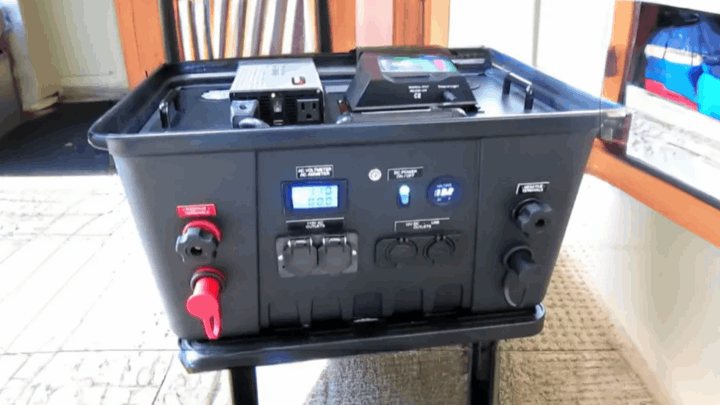
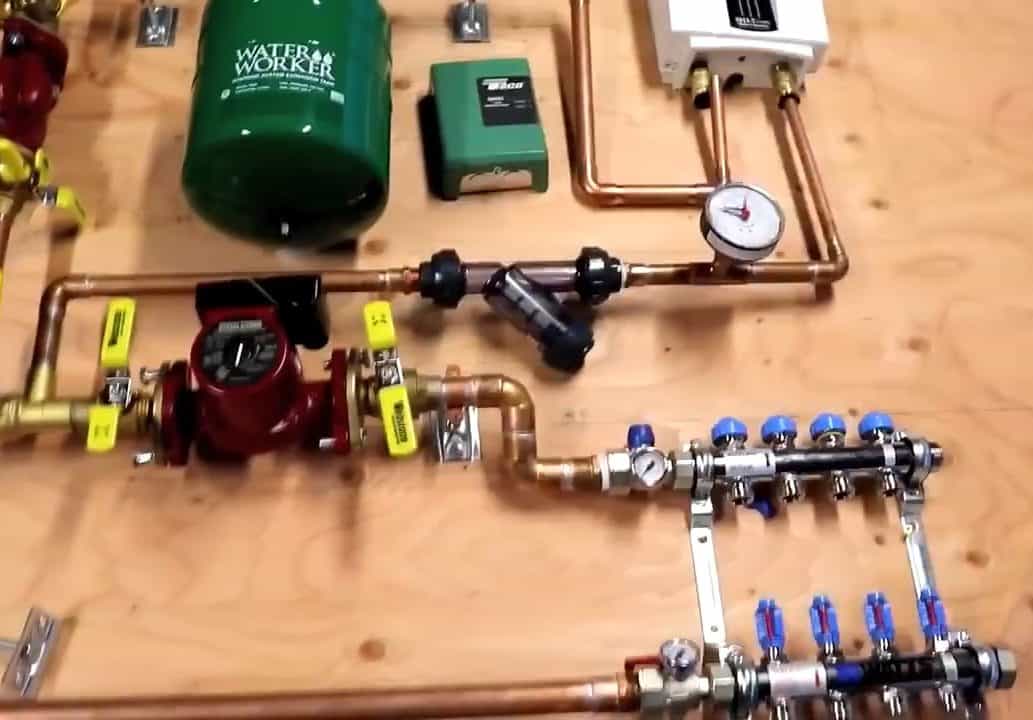
STEP 4 : ASSEMBLING THE HEATING COMPONENTS
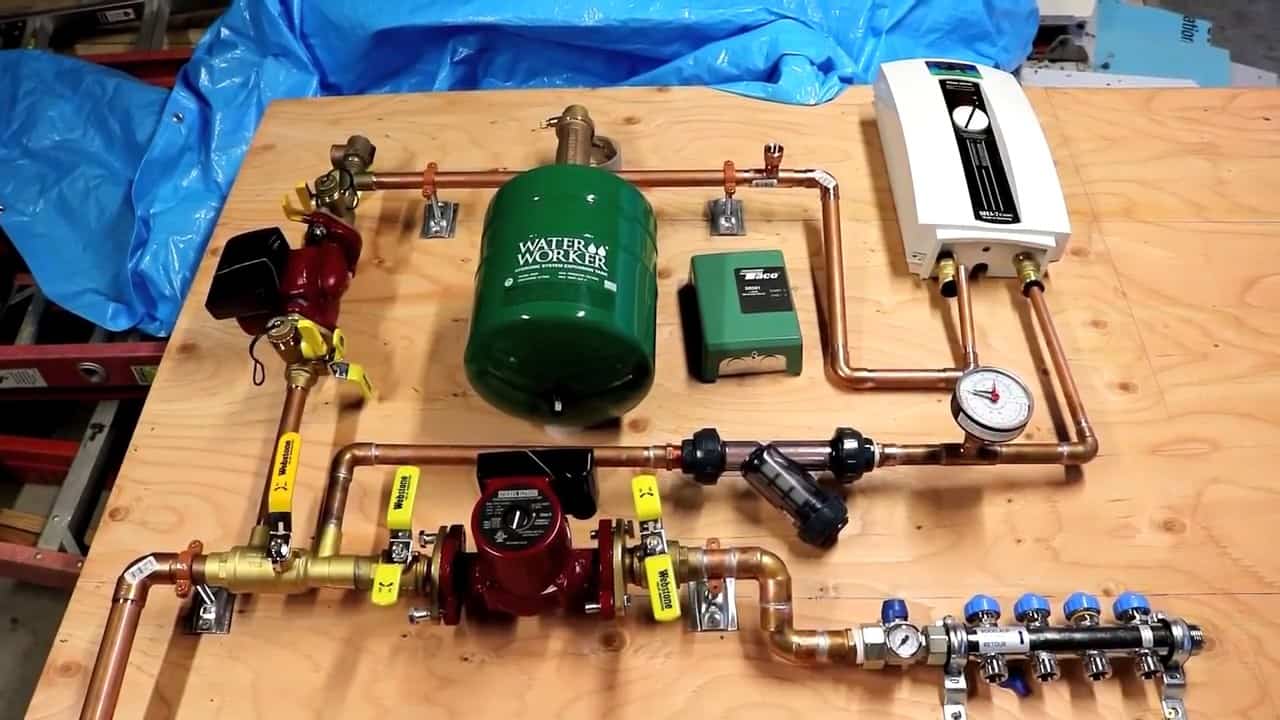
The heating components of this system are essential for maintaining the desired temperature and ensuring the efficiency of the system.
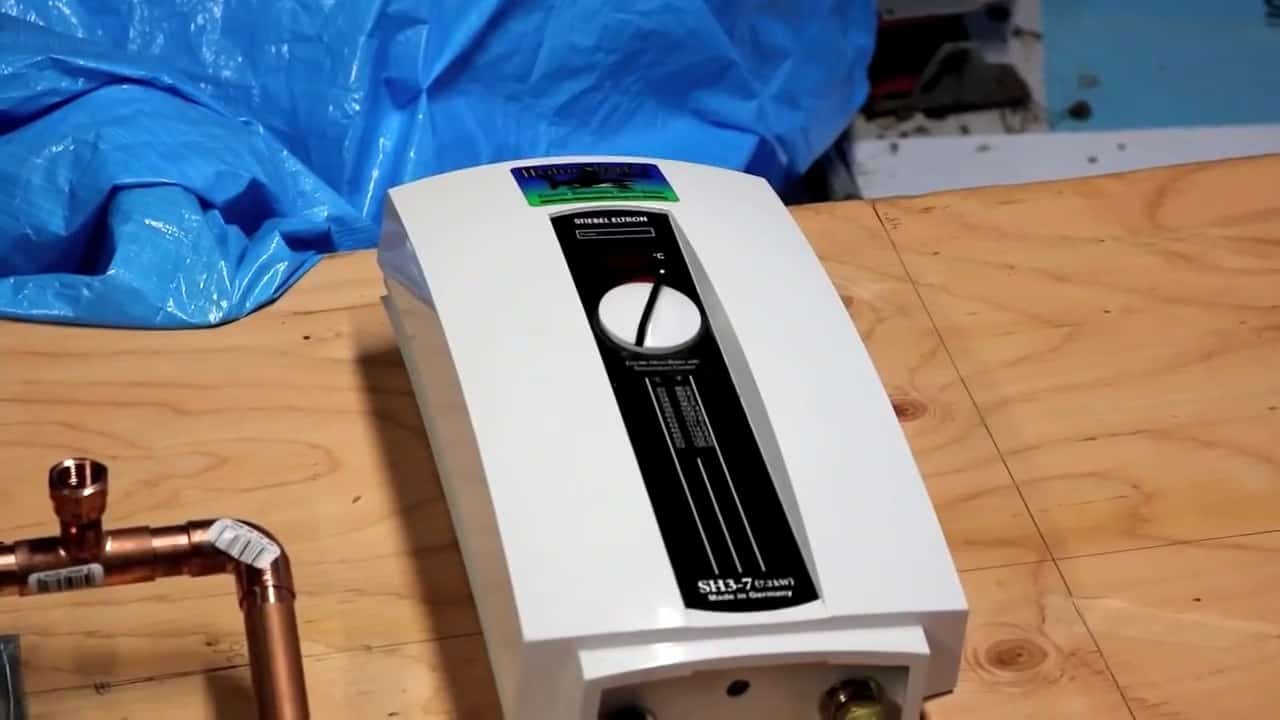
To begin with, we need to choose an appropriate heater that can handle the demand of heating the space. In this case, we have chosen a heater with a rating of 7.2 kW, which is suitable for the garage size and the length of the pex tubing.
The heater is designed to be flow activated, meaning it only activates when water is flowing through it. To ensure proper circulation of water, we need to install a circulating pump.
The pump will move the water through the tubing and activate the heater based on the temperature setting.
To mount the heating components, we will use a 4 X 4 square sheet of plywood as a base. This provides stability and helps to keep the components organized.
STEP 5 : CONNECTING THE CIRCULATING PUMPS
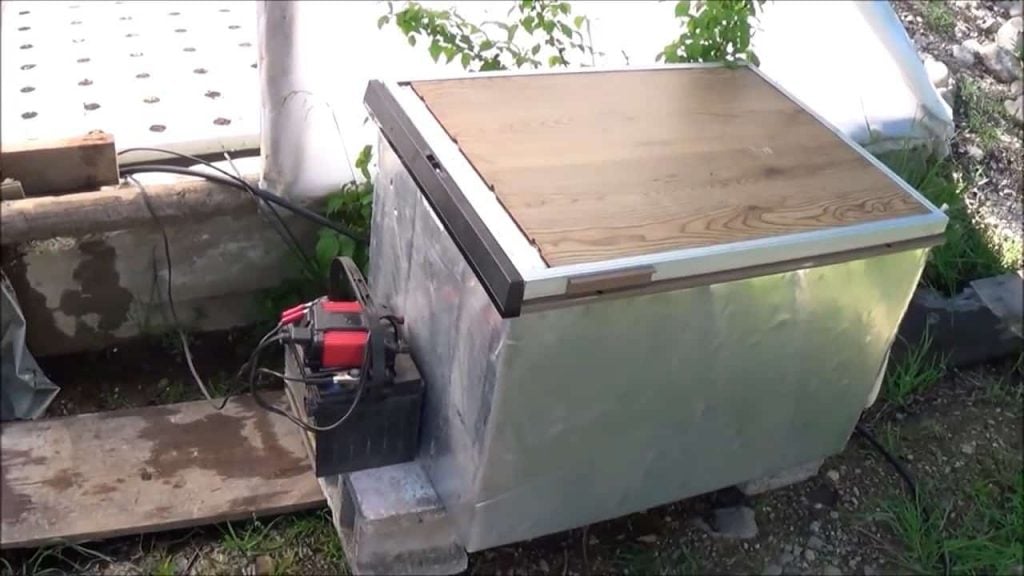
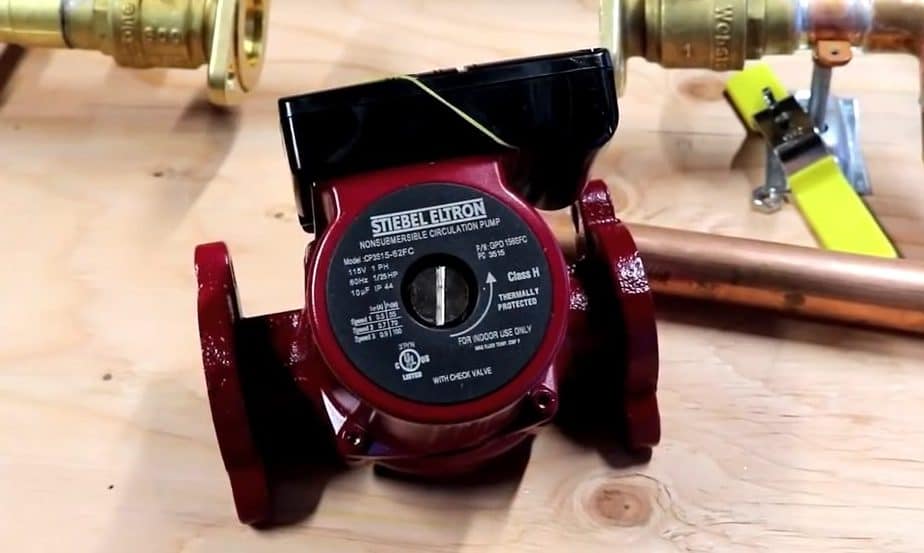
To ensure efficient operation of the hydronic heating system, two 120V fractional horsepower circulating pumps are utilized.
The first pump is responsible for moving water through the heater, while the second pump circulates the heated water through the PEX loops in the garage floor.
These pumps are compact and energy-efficient, with an inbuilt garden hose connector system used for draining. They are typically designed with a bronze or stainless-steel body for durability and resistance to corrosion.
The garden hose connector system makes it easy to drain the water from the system for maintenance or repairs.
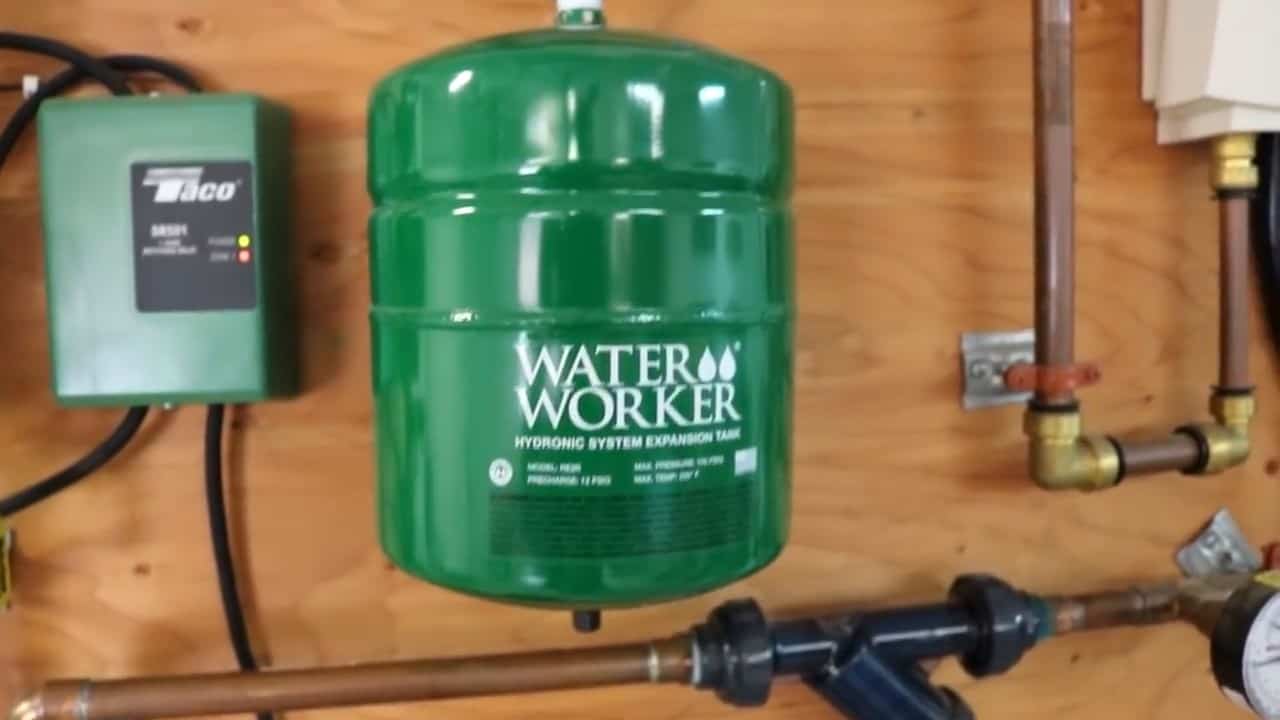
Once the hot water exits the heater, it is directed towards a pressure tank. This tank plays a crucial role in ensuring the smooth functioning of the system.
Firstly, the tank removes any air bubbles that may be present in the hot water using an air release valve. This is important as air bubbles can cause blockages in the tubing, which can ultimately result in inefficient heating.
Secondly, the pressure tank also acts as a buffer, preventing water hammer in the system. Water hammer is a hydraulic shock that can occur when water flows through a pipe and suddenly stops, causing a loud banging sound. The pressure tank absorbs these sudden surges in pressure, ensuring that the system operates
After the hot water is released from the pressure tank, it is connected to the flow-activated circulating pump for the heater using shut-off valves for filling and draining the system.
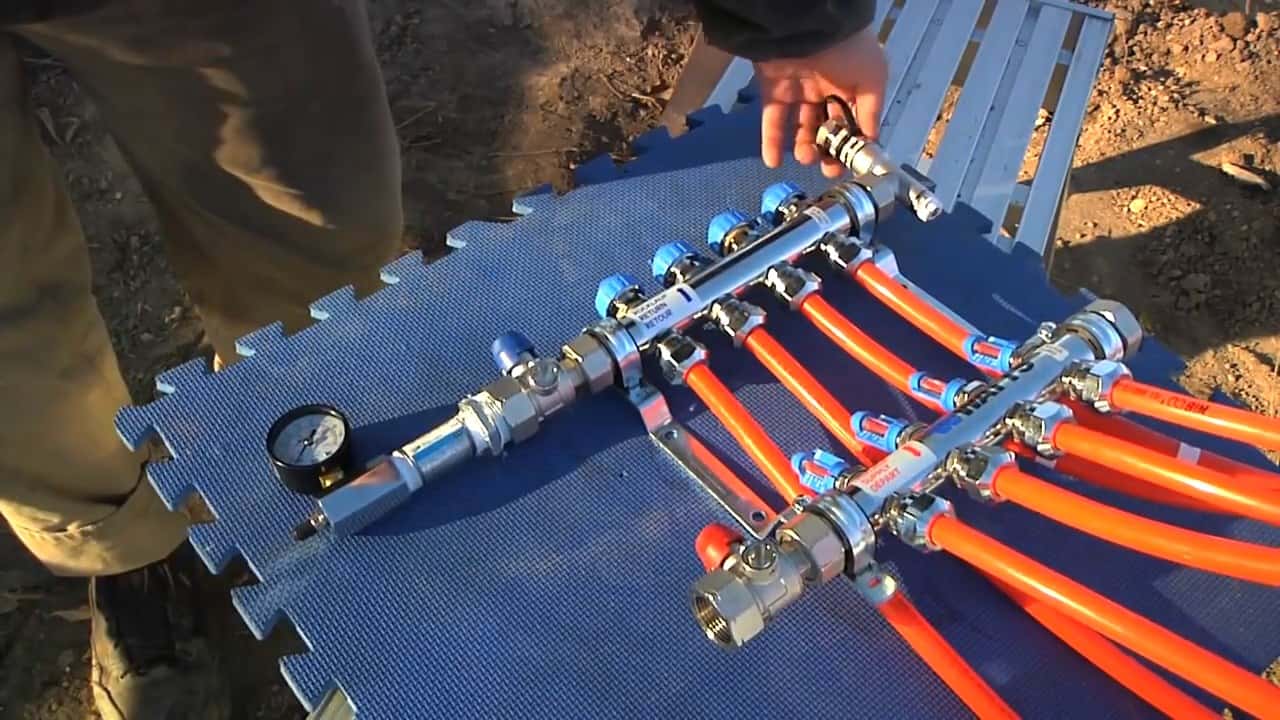
The water then travels down to a stainless steel manifold where it is distributed through the supply end of the pex tubing. The heated water is split into four supply loops at the manifold, which then flows through the pex tubing circuits embedded in the concrete floor.
The stainless steel manifold serves as a central hub for the system, distributing the hot water evenly to each of the four supply loops. The manifold is designed with isolation valves for each supply loop, which makes it easier to maintain and repair the system if needed.
The supply loops are responsible for delivering the heated water to the pex tubing circuits installed on the concrete floor. The flow rate of each loop can be adjusted with the help of flow meters installed on each supply line, allowing for precise control of the heating system

After the water flows through the four supply loops and warms up the concrete floor, it returns to the return end of the manifold through the other four loops of PEX tubing.
The water then passes through another circulating pump and a Y strainer filter to remove any debris or particles that may have accumulated in the system.
The Y strainer filter is an essential component of the system as it prevents any debris or rust from circulating through the heater or the tubing, which can cause blockages and damage to the system.
Once the water passes through the filter, it is then pumped back to the heater to be heated once again. This creates a continuous loop, with the water being heated and circulated through the PEX tubing in the floor, providing a consistent and even heat throughout the space.
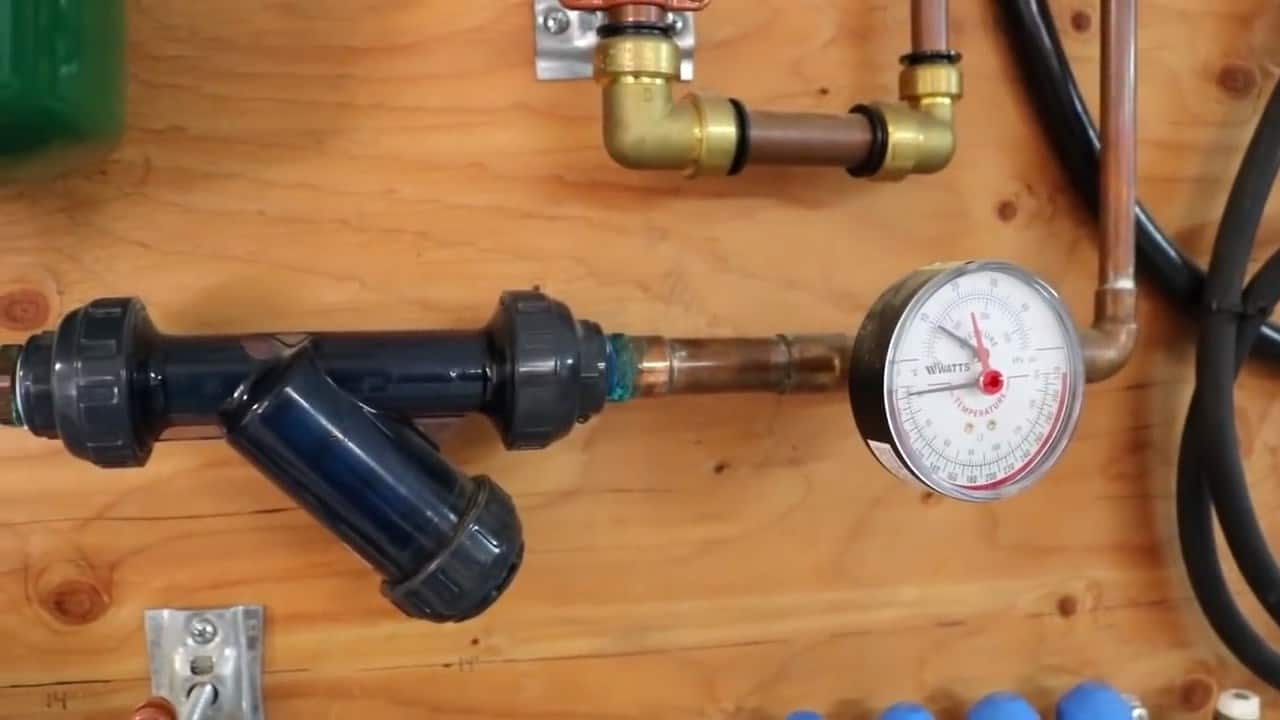
To ensure efficient heating, two thermometers are installed, one at the supply end and the other at the return end of the pipe.
The thermometer readings allow for monitoring the temperature difference of the outgoing water and the returning water. This is important to ensure that the water returning to the heater is sufficiently cooler for reheating.
The flow rate is regulated by a thermostat and a switching relay that turns on the circulating pump. When the thermostat detects that the temperature of the water has fallen below a certain threshold, the switching relay activates the circulating pump, which then starts to pump hot water through the pex tubing.
Once the temperature of the water has reached the desired level, the switching relay turns off the circulating pump to avoid overheating.
Site Credits : BenjaminNelson