In this project, we will be constructing a two-stage water filter that is not only simple and cost-effective but also doubles as a stove burner.
The filter is designed to purify different types of water, including pond water, stream water, and swamp water, making it an ideal solution for outdoor enthusiasts, hikers, and survivalists.
STEP 1 :THE MATERIALS REQUIRED
The materials needed are bricks, bottles, copper coil, activated carbon, sand, and gravel. These materials are readily available and can be found at local hardware stores, home improvement centers, or online.
The bricks will serve as the foundation for the filter, providing stability and support. The bottles will be used to create the filter chamber and can be easily sourced from any household.
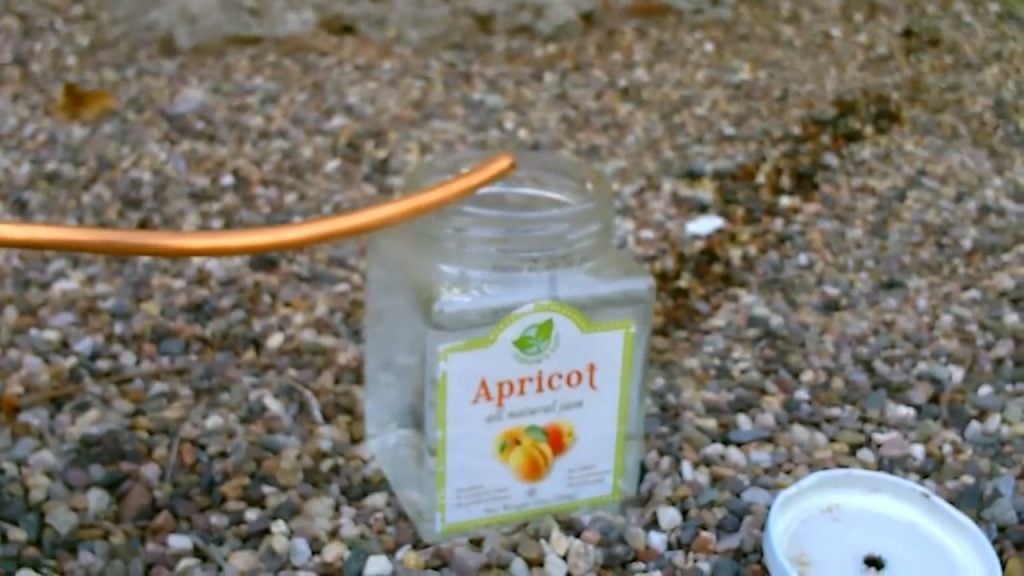
The copper coil is an essential component that will be used to heat the water and can be purchased from a local plumbing store.
The activated carbon is a critical element that will be used to purify the water, and it can be found at pet stores or aquarium shops.
The sand and gravel will be used as filtering media and can be sourced from any landscaping supply store.

The filtration process involves using a combination of sand and activated carbon, which are situated on the far left side of the unit.
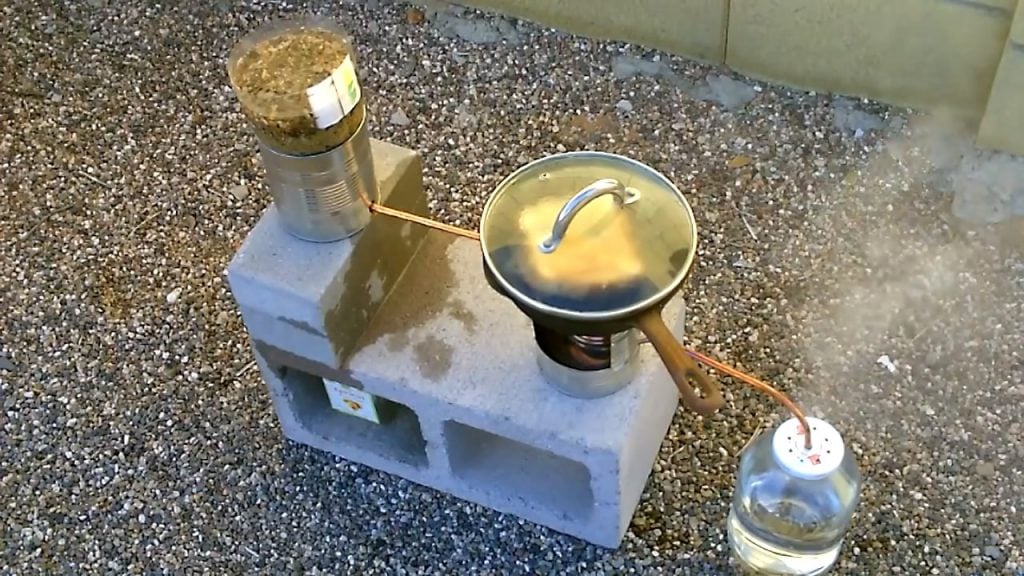
The water is then heated in a copper coil at the center of the unit, which is fueled by isopropyl alcohol. As a result of this process, the purified water exits the unit on the right side.
STEP 2 : MAKING THE 1ST STAGE FILTER
The next step in constructing the two-stage water filter is to create the first stage filter. This involves using a 2-liter bottle that has been cut in half and drilling a quarter-inch hole at the bottom.
The hole serves as an inlet for the water to enter the filter.
After creating the hole, a couple of cotton balls are added to the bottom of the bottle and packed in tightly.
The cotton balls act as a pre-filter and help to remove larger particles and sediment from the water before it passes through the sand and activated carbon in the second stage.

STEP 3 : 2ND STAGE FILTER
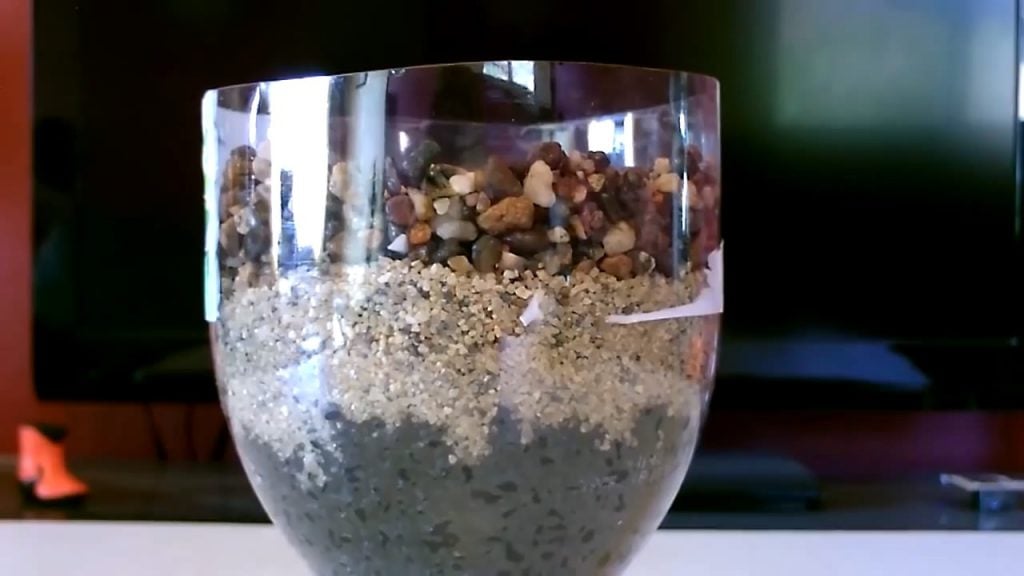
The next step in building the two-stage water filter is to add the filtering media, which include activated carbon, sand, and gravel.
Before adding the filtering media, it is important to rinse them thoroughly to remove any dust, debris, or other contaminants that may be present.
Activated carbon is an essential filtering media in the second stage of the filtration process. It has a high surface area and is effective at removing organic compounds, chemicals, and other impurities from the water.
Sand and gravel are also used as filtering media, and they help to remove larger particles and sediment from the water.
When adding the filtering media, it is important to ensure that they are added in the correct order.
The sand is the coarsest media and should be added first, followed by the activated carbon and then the gravel. Each layer should be packed tightly to prevent water from bypassing the filter.
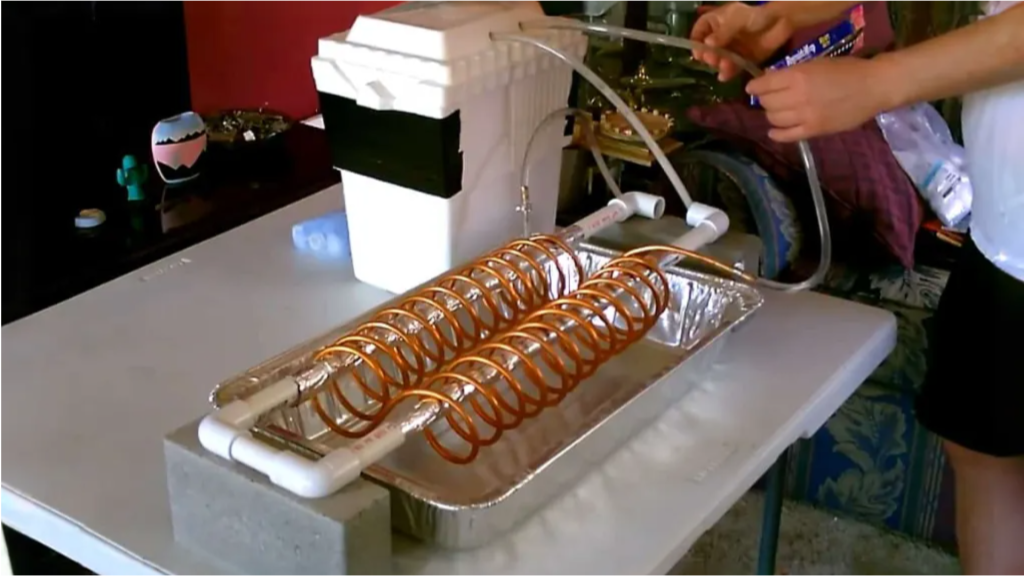
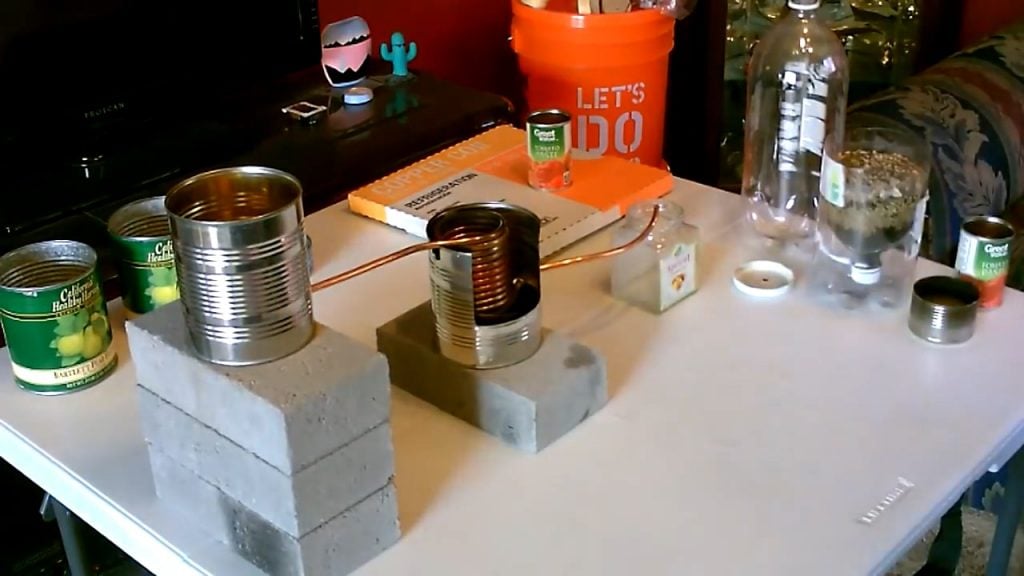
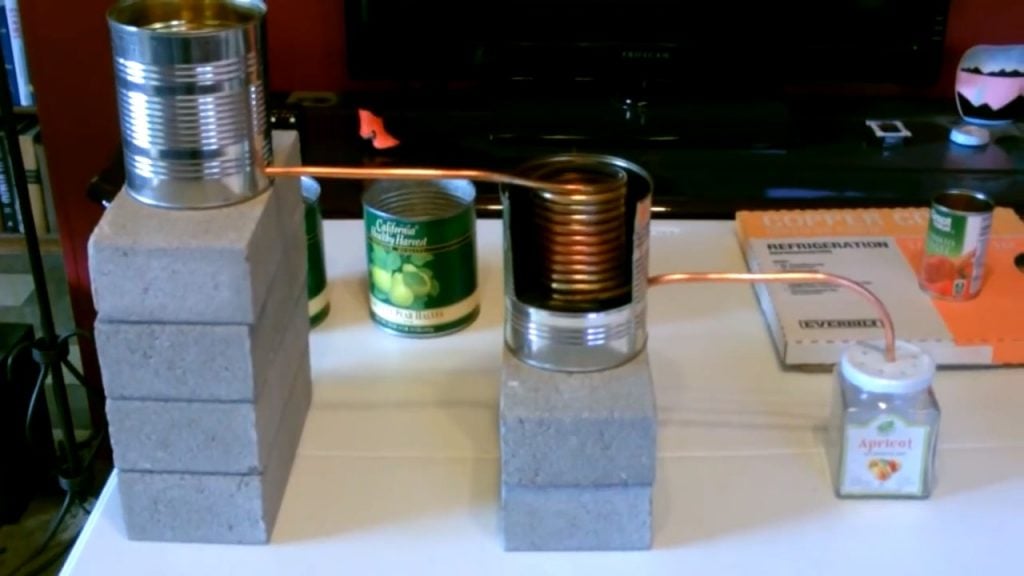
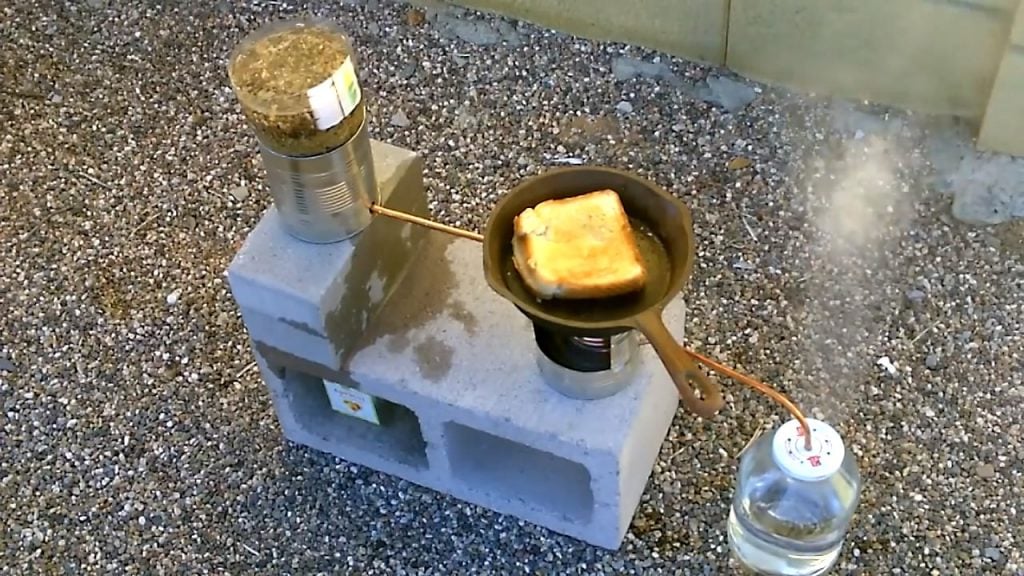
STEP 3 : CONNECTING THE COILS WITH THE CANS
The bricks should be aligned in such a way as to provide a stable and level base for the cans. Once the bricks are aligned, the cans should be placed on top, ensuring that they are positioned correctly.
The middle can should be slightly raised to accommodate the small tin containing the isopropyl alcohol, which serves as the fuel source for heating the water.
The copper coil, which serves as the heat exchanger, is then inserted into the middle can and connected between the first can and the water bottle.
STEP 4 : PLACING THE MIXTURE ON THE TOP
After adding the filtering media and properly positioning the copper coil and fuel source, the next step is to add the sand mixture filter bottle on top of the first can.
The sand mixture filter bottle serves as the second stage of the water filtration process, and it contains the sand, activated carbon, and gravel filtering media.

STEP 5 : DRILL A HOLE AT THE BOTTOM
To prepare the first can, it is necessary to remove the label and ensure that the surface is clean and free of any residue. Then, a small hole should be drilled at the bottom of the can.
The size of the hole should be sufficient to allow the water to flow through the filter media but small enough to prevent the filtering media from falling through.

STEP 6 : REMOVE THE TOP AND CUT A SECTION
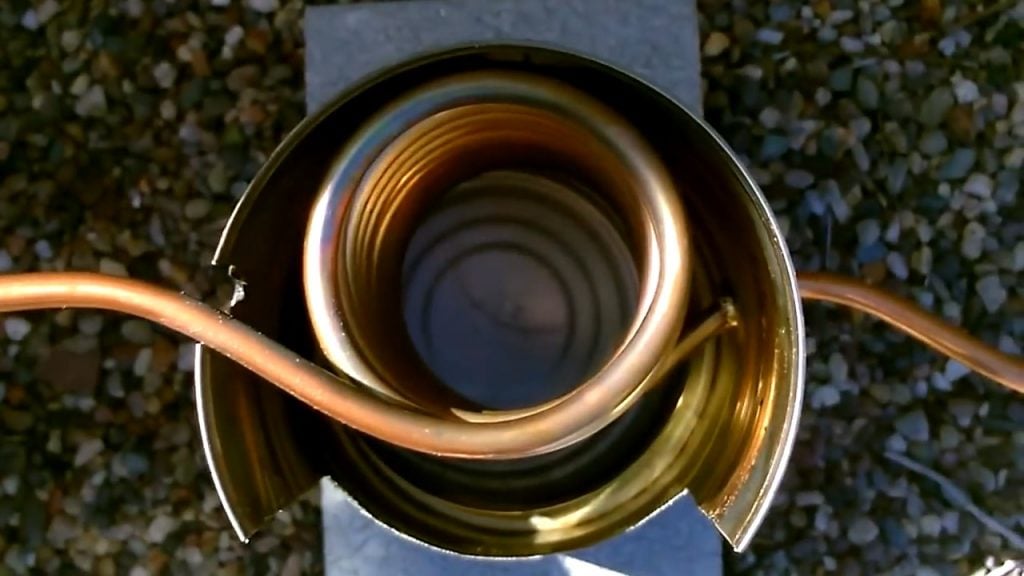
The second can in the two-stage water filter and stove burner is the can that holds the copper coil.
Preparing this can involves cutting down the top and making several modifications to accommodate the copper coil and ensure optimal heat transfer.
To prepare the second can, start by cutting down the top, taking about a third of the circumference off, and cutting about two-thirds of the way down.
This will create a notch for the copper coil and allow for proper positioning of the coil within the can.
Next, create a small notch on the top of the can to allow for proper alignment with the first can.
This will ensure that the water flows smoothly from the first can through the copper coil and into the second stage of the filtration process.
Finally, a hole should be created at the bottom of the can to allow for insertion of the copper coil. This hole should be sized to fit the copper coil snugly to prevent any water from leaking out during the filtration process.
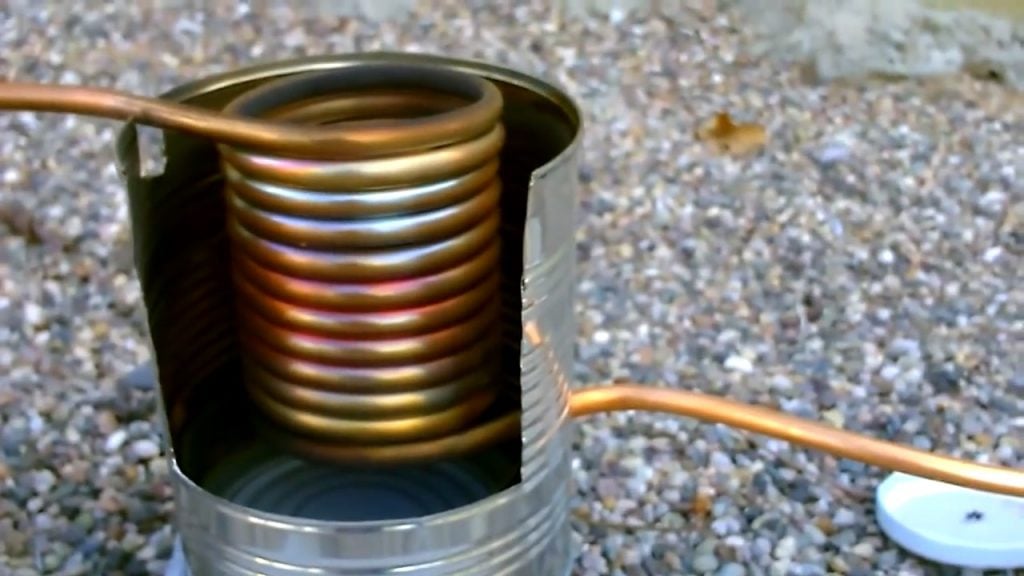
The copper coil in the two-stage water filter and stove burner serves as the heat exchanger, transferring heat from the fuel source to the water being filtered.
To install the copper coil, start by wrapping it around a small can from top to bottom. This will help to create a compact coil that fits snugly within the second can.
Once the coil is wrapped around the can, push the can out, leaving about a foot of copper coil on either side.
This will allow for proper positioning of the coil within the second can and ensure that it comes into contact with the fuel source.
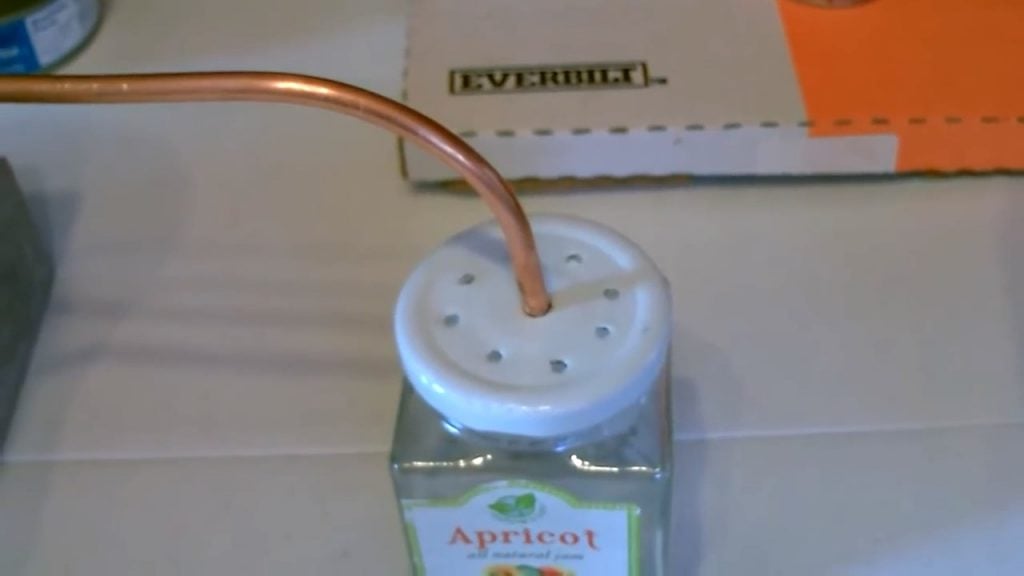
STEP 7 : ADDING STEAM VENTS
It is also important to drill steam vents to prevent pressure buildup within the can.
Also, placed some bricks beneath the copper tubing and pointing the end directly into the can, any water that condenses on the copper tubing will flow back into the can and be available for filtration.

STEP 8 : STARTING THE STOVE
Firing up the two-stage water filter and stove burner involves using isopropyl alcohol as the fuel source to heat the copper coil and purify the water.
To start the filter, pour isopropyl alcohol under the copper coil and light it using a lighter or match.
Once the alcohol is lit, the water within the first can will begin to heat up and move through the filter system, undergoing the filtration process and emerging purified from the second can.
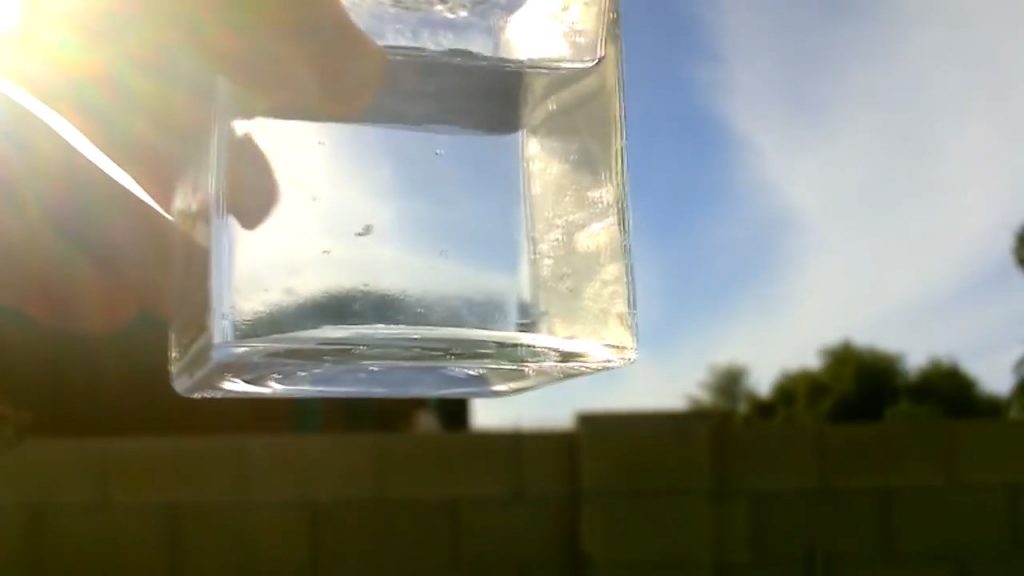
This gravity-fed two-stage water filter should take care of pond water, stream water, swamp water, and just about any water you can think of.
Proper storage of the two-stage water filter and stove burner is essential to ensure that it remains in good condition and is ready for use when needed.
An easy and practical way to store the filter is to use the bottom half of the two-liter bottle that was cut in half during the construction process.
To store the filter, simply drop it into the bottom half of the two-liter bottle and secure the bottle cap to hold it in place.